
Installation of plinths in the room is an important stage of repair. After all, it is the plinth that is able to finally fix the floor covering if desired, and just create the so-called edging of the room. Plinths are divided into ceiling and outdoor. And if when installing the ceiling plinth, there are usually no questions, since it is attached exclusively to glue, then when working with plinths on the floor, important moments and subtleties should be taken into account.
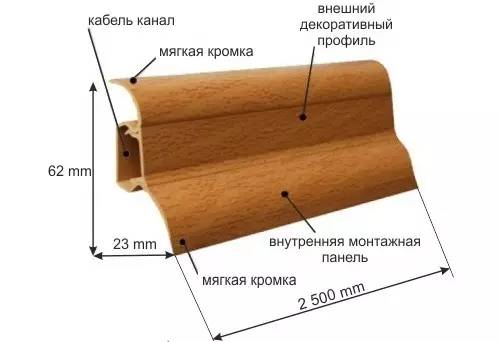
The device of plastic plinth.
There are three types of floor plinths: made of concrete, wooden and plastic. The option of concrete plinth is not relevant today. It was used earlier when very old houses were built. But wooden and plastic plinths deserve separate attention. Therefore, the installation of the plinth is with your own hands to the floor from these materials below will be considered in more detail.
Plastic floor plinth
Pros and cons of plastic
To begin with, consider the option of how to install plastic plinth on the floor. This attribute appeared not so long ago, but at the same time immediately captured the large contingent of consumers. This is largely due to the positive aspects of plastic plinths. Undoubted pluses include:
Plinth installation steps.
- resistance to temperature changes and sunlight; Thanks to the special chemical coatings, the plastic absolutely does not fade under the action of sunlight, and in case of fire, it does not light up, only melts;
- moisture resistance; The plinth of this type is not afraid of any moisture, no different kind of cleaning products and drugs, this suggests that such material is appropriate not only in residential premises, but also in the bathroom, toilet and in the kitchen;
- relative cheapness of material; Compared to the plastic tree, it is much cheaper, and this absolutely does not affect the variety of textures and colors, as well as the duration of the service life;
- ease of installation and subsequent operation; Plastic is well bended and cutting, so its installation will not require many skills and strength from you, during subsequent operation, such material does not need to be lacquered or painted, which is also a big plus.
Article on the topic: Curtains from organza photo
But despite such significant advantages, plastic plinths have a number of disadvantages to which the release of toxic substances include high temperatures, the possibility of mechanical damage (the appearance of cracks and chips) at large loads or during the movement of furniture in the room, the inability to change the selected already texture and color after installation on the floor.
Measures and purchase of material
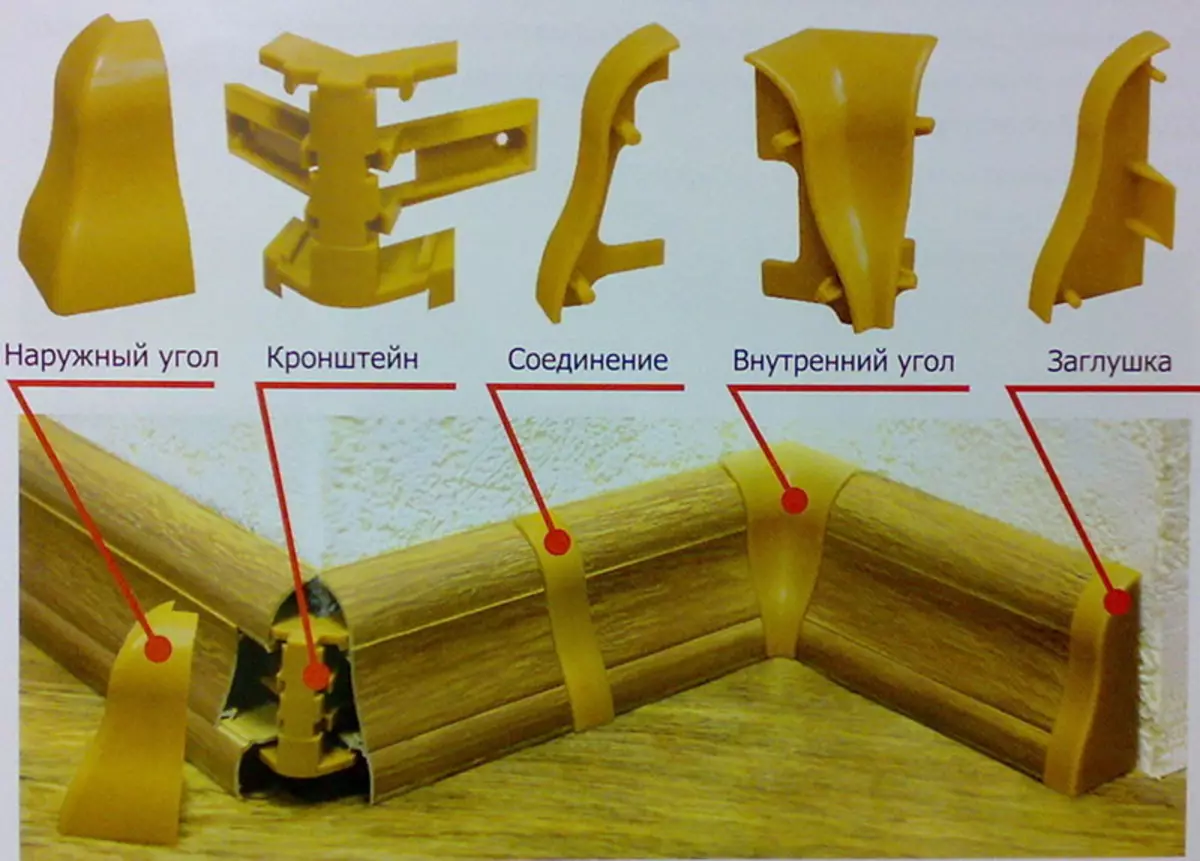
Figure 1. Accessories for installation of plinth.
After the main review of the practical characteristics of plastic plinths for the floor, the time is the time to proceed directly to the installation process. The design of the design is carried out in several uncomplicated steps. But before this you need to stock up with such instruments and materials:
- roulette;
- markup pencil;
- Plastic dowels, selflessness or liquid nails (depending on the installation method);
- Plinth profiles themselves and additional accessories to them.
The first stage is to work all the necessary measurements that are needed to calculate profiles. First, with the help of a roulette, we measure the perimeter of the room without taking into account door openings. The resulting digit will be equal to the number of the desired plinth. To calculate the number of planks, this magnitude is simply separated by a single bar. Please note that it is better to purchase a plinth of a little with a reserve, especially since it is not so expensive.
In addition to the plinth, it is necessary to calculate the number of fittings needed. Mandatory elements for plastic plinth are lateral plugs, corners (external and internal), as well as the planks for the connection. The diagram shows how all this accessories looks like (Figure 1).
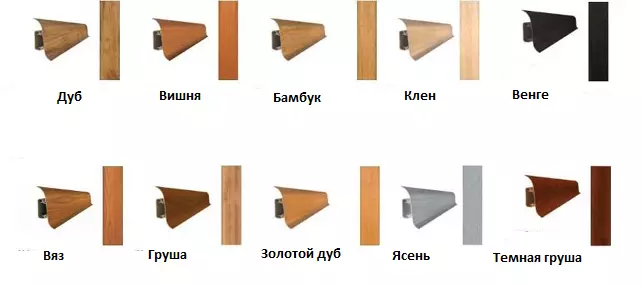
The color of the plinth must be most suitable for the floor color.
Now you need to buy it all. When buying, immediately define with the color range: the plinth on the floor and accessories must be harmonized and the coincidence as much as possible with each other both in color and by texture. An important point is the presence of a cable channel in the plinth. It represents small inner openings, which are necessary in order to hide the wires in them.
Determine how many wires will pass along the walls. After all, there may be several such channels in the plinth, which is very practical. At the same time, it is not possible to remove it in case of damage to the wire, it is not worth it. Modern plinths allow you to freely open access to the channel and get the wires without destroying the design.
Article on the topic: wallpaper Abstraction for walls: interior options
Methods for fastening plastic plinth
Installing the plinth with self-samples is considered the most reliable.
So, the main material has been purchased. Now you can start setting. Consider the 3 main method of installing such materials: self-draws, glue and plastic dowels. Each method has both pros and cons. Therefore, before being taken for work, it is important to familiarize yourself with the specifics of all these methods.
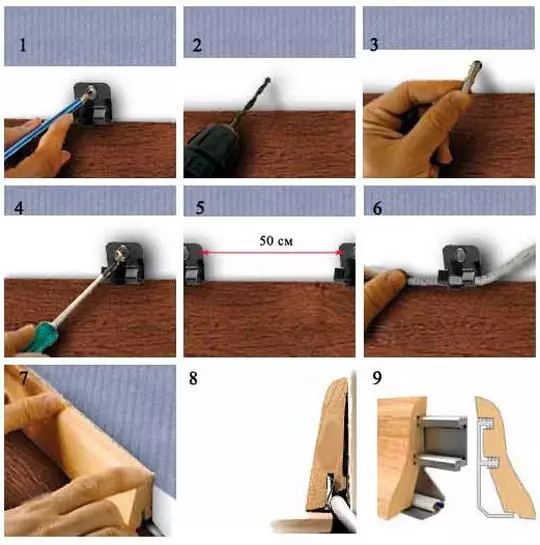
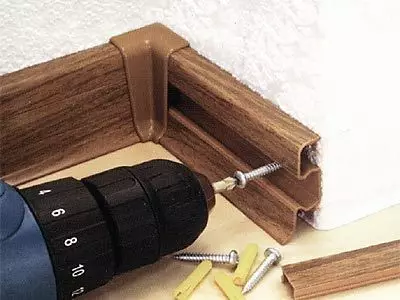
The installation of plastic plinths using self-samples is considered the most reliable. Indeed, in the process of work, the plinth will not only be tightly tightly to the wall, but it will be reliably to enter with a self-tapping screw in its thickness, which will not give in the future design and deform.
First, with the help of a drill, do in the hole profiles every 45 cm. After that, apply the marked profiles to the fastening and pencil places through the hole holes on the wall and the floor. Then at these points also drill holes where dowels are driven. You will now remain just to kill the plinths to the wall through the screws.
When installing, work carefully so that cracks do not appear on the material. The hammer is better to use the lightweight, the best rubber. Self-tapping caps Specialists advise to be dragging the plumps so that they are not so noticeable at first glance.
The second way is to fasten the design to special fasteners - dowels. The principle of such installation is largely similar to self-stakes. First markings are made, the holes in the wall are drilled, where dowels are driven. At the same time, the plinth itself remains without holes. After that, the plinth is applied, the screwdriver and screws are connected to the dowel.
However, this method is a bit worse than self-tapping screws in that when damaged a separate piece, you will have to change the entire plinth in the room, and not its part. You will not be able to disassemble the design without damage, and it will be necessary to change it all.
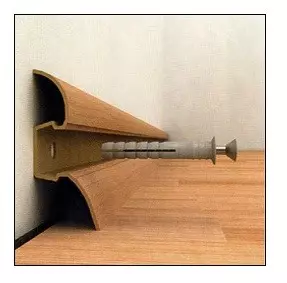
Installing plinths on a dowel is similar to installation on a self-tapping screw.
Finally, the last method is the installation of the structure to liquid nails. Option is the easiest and fastest. But note that the plinth installed by this method will be difficult to dismantle. In addition, liquid nails allow the material to be adopted both with the floor and with the wall. And this already suggests that under the plinth wallpaper, linoleum, tile or other coating will be damaged.
Article on the topic: Balcony laundry dryer
Installing this method of plinth simply: you must first place the profiles in those places where they will be, and then laminate the plinth edge glue (from the floor and walls) and firmly press to the surface. Note that the corners and connections are installed on the planks in advance and glued together with them. From how firmly the plinth will be torture, depends on whether there will be large visible lumets between the plinth, wall and floor.
Installation of wooden plinth
Now we go to the consideration of the installation of the plinth from the tree. Before considering it, there should be significant pluses of a wooden structure. This is environmentally friendly, ease of installation, the ability to change color or shade, high strength to cracks and osquam. As deficiencies, only large cash costs can be distinguished than on plastic material.
The installation of a wooden plinth starts with work on corners. To do this, you need to place the planks along the wall, and then with the help of a circular saw and the grid, you need to level the edges of the corners. Fill it is necessary at an angle of 45 °. As a result, if everything is completed correctly, on the corners of the bar will be perfectly shy, and the seam between them will be visible. If all the same there will be small lumens, they can be easily eliminated later.
After drinking, you need to mount the plinths. The mount is made in the same way as with the attachment method on the screw of the plastic plinth. Principles are the same: the distances between the holes 45 cm, you need to score a dowel into the wall, and the planks through the screws should be attached to them. At the same time, it is important that the hats of the screws are slightly drowned into the plinth.
After the end of the attachment, you need to give a wooden plinth normal view. For this, possible cracks between the joints are embedded with a putty or smear. After drying, the plinth is covered with paint or varnish for wood. Varnish is recommended to apply in two layers - so the surface will be better to glisten.
So, the main subtleties in the installation of plinths are considered with their own hands.
It can be concluded that the main thing in this matter is the slowness and the right choice of material. And then you will definitely succeed, and the result will always please you.