
Installing the shell in the kitchen or in the bathroom usually does not represent any difficulties. At all, it is not necessary to cause plumbing to carry out its mounting to the wall, connect the pipes and mixers. You should consider what types of shells today can be found on the market, it is necessary to stop in detail on the features of their installation to the wall of the wall in the bathrooms and kitchens.
Scheme of the installation of granite shell.
Types of kitchen and bathroom sinks
It is possible to mount the sink of any model on your own. A large range allows you to choose exactly the design that is suitable for your interior most and which will be convenient and comfortable in operation.Main types of sinks:
- Overhead. Bold the washbasin of this type is the easiest way, as it is fixed on the tabletop, a little speaking over its surface.
- Suspended (console) sinks are hung on the wall. Bashed the sink is best with the help of brackets, the cabinet or the countertop is not needed here. Such a variety include washbasins on the pedestal, the so-called tulips.
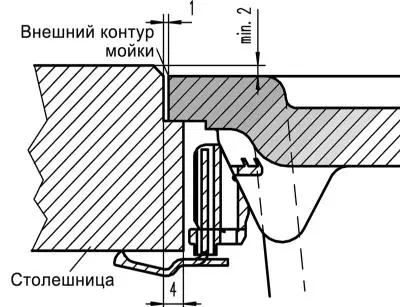
- The mortise are mounted in the worktop, the seal seal is required, the fastening itself is made from the bottom of the washbasin bowl.
- Furniture washbasins are supplied in a complete set with furniture (kitchen or for the bathroom), they are mounted on a special tube or stand, worktop.
Installation of the shell on the end
Scheme of sinks with dimensions.
The sink on the end is perfectly fits in almost any interior, with the help of such equipment you can promise drainage pipes, make a place to locate economic trifles, towels and other things.
When fastening the sink to the wall, in this case, the first is mounted. Most often it does not require any additional fastener, but simply put on special legs that can be adjusted in height. After the cabinet is installed in place, the sink fastening is carried out in the cut-down.
A rubber gasket is inserted into the drain hole, which is tightened with the nut. The lattice pipe should be put on a shut-off nut, which has a wedge-shaped ring. After a glass of siphon is joined, pressed against the locking ring, the nut is screwed.
Article on the topic: Types and stages of construction of columnar foundations
The tap for the siphon is connected to the sewer, it is best to use a flexible corrugated pipe. The sewage sewage opens, a rubber ring is inserted into it, the outer diameter of which is 70 mm, and the inner - 35. Now the drain pipe is connected to the siphon and sewer output.
It is very easy to check the tightness, it is necessary to fill with the shell with water, if there is a flow, then turn the nuts stronger.
Lastly, the installation of mixers is carried out, the specifics of the work depends on which design it has.
Installation of the shell with brackets to the wall
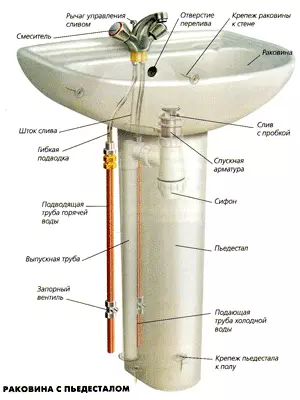
Device of the shell with a pedestal.
The option when the fastening of the sink is carried out with the help of brackets, it used to be the most popular. And so far, it is often preferred to him, although there are many other options on the market, no less attractive and reliable.
Work begins with the fact that marking on the wall surface. With the help of a metal line and construction level, it is necessary to carry out a horizontal line at an altitude of about 80-85 centimeters above the floor. This is the usual arrangement of the shell, in which it will be convenient to use. Next, down from this line it is necessary to make marks that are equal to the thickness of all side edges of the sink, with which it will rely on the fasteners brackets. At the same distance you need to make a mark on the other hand. Marks are combined with a straight line.
When fastening the sink to the wall, this method will have to turn over the equipment itself upside down, on the support side surfaces, fix the brackets that should usually go in the kit. Now turn over the sink, apply it to the wall, where they make marks for future fasteners. With the help of a drill, the holes drill the plugs in them, screw the fastener brackets into place.
Now you can fix the sink to the brackets, with the help of a wrench you screw all the dowels. For a stable and tight location of the washbasin, you need to use laying washers.
Article on the topic: How to cover the lining indoors
Now you can fix the drain system, using a tap tube and hydraulic shutter, siphon for sink. More convenient - fix on the brackets or to the end - now to solve you.
Installation of a washbasin with a pedestal
Drawing of the suspended shell.In most cases, the installation of the washbasin is carried out near the wall, the location in the corner is rare, as it is not always convenient. The sink itself is also attached to the surface of the wall. Of course, the wall should not be out of GWL, but from concrete, brick, etc.
Installing the shell with a pedestal allows you to hide the presence of a drain sewer pipe with such an installation to the wall, which usually goes to the floor. It is necessary to plan the arrangement of the sink so that its drain hole completely coincides with the output of the sewer pipe, which should go strictly in the center. Otherwise, it will be simply impossible to fasten the pedestal.
For marking, it is necessary to cover the sink without fastening tightly to the wall, after which it makes markers in places where special fasteners will be located. After that, the washbasin is cleaned, with a drill, drill holes, insert corks in them. The fastening holes of the washbasin are connected to the velocked holes on the wall surface, after which, with a wrench, it is necessary to attach the shell with screws or dowels. At the same time, it should not be fused or move away from the wall, its location should be dense and reliable (but this does not mean that it can be rejected on the sink).
After the installation of the washbasin bowl is over, it is necessary to connect a drain siphon with a pipe, insert it into the sewer of the sewer plum in the floor, check the absence of leaks. The pedestal is mounted last, after all verified. It is often attached to the sink with special bolts, but there may be an option to fasten it to the wall, for this kit must go special fasteners.
Installation of the shell with a semillocation
Installation of a washbasin with a semillocation is possible in the case when the sewer pipes are completely sealed into the surface of the wall, that is, the discharge of the drain will be located in the wall, speaking from about 50 cm. The sink itself is set in the usual way, after which the studs should be mounted in the wall which will be fixed half-outdoor. Its eyelashes must be combined with studs, after which you can start connecting the sewer and water pipes, installation of mixers.
Article on the topic: How to install cavalry over the bed in the bedroom?
This option is rarely applied, as it is not always recommended to install sewer drain pipes in the wall.
Mounting shell with suspended shelf
To secure a washbasin on a special suspended shelf hosting all the reference load, you must first select a place. Such a shelf will become not only a reliable element of the support structure, but also a shelf for various toiletries. The use of a two-storey shelf will also disguise the drain system, speaking as a place for storing economic trifles.
First, the location of the fastener for the sink to the wall is approximately at an altitude of 80-85 cm from the floor. With the help of a drill, drill holes, insert corks into them, with a dowel with special laying washers to attach a washbasin to the wall. After that, the shelf under the sink is attached using a level in a horizontal position, on its upper plane, where the drain hole will be located, it is necessary to mark the place for wiring a drain pipe. Do it with a drill and a special nozzle.
Now with the help of the chisel, a hole in the shelf for a washbasin is made, the mixer is installed. Now the shelf for a washbasin can be finally fixed on the wall, aligning a drain hole on the shelf and sink. Under the niche is a siphon, which is combined with a seven-sewer plum and holes.
To work on fastening the sink to the wall you will need such tools as:
- Drill and set of nozzles and drills;
- washers, dowels;
- chisel;
- Construction level, pencil, metal line.
With the installation of the shell, almost everyone can cope with the wall, it is only necessary to consider that all washbasins have a different design. It is important to correctly determine the place where the sink will be placed so that then it was possible to accurately comply with all sewage and water pipes.