
Plumbing siphon is a water shutter, aimed at preventing sewer gases to premise.
To avoid troubles during the installation and operation of the siphon, it is necessary to choose a high-quality plumbing siphon and properly assembled by the attached instructions.
The competent installation of the siphon between the flow of sewerage and the bathroom is ensured by the correct assembly and the presence of high-quality plumbing.
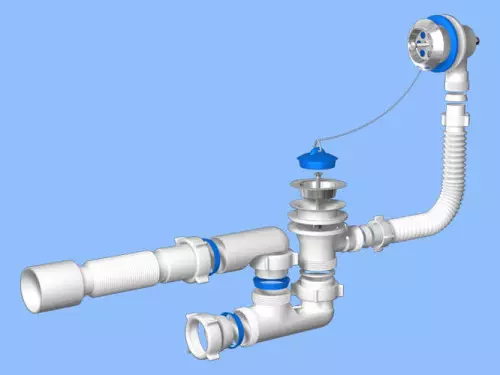
The siphon for the bathroom includes a plum pipe and a pouring pipe, which are connected in front of the shutter, followed by the water in one pipe goes into the sewer. All baths, regardless of the configuration, are equipped with siphons. Siphons can be located in different places and are made of a wide variety of materials: polypropylene, steel, brass, PVC and others. To properly plant the siphons on the place intended to them, their form should not be monolithic or tough. In the siphons, flexible plastic pipes are ponded, which are easily adjusted in length when the siphon is connected to sewage.
Installation - Preparatory Stage
Bath siphon device.Initially, all the details of the siphon need to be checked for no damage and marriage, because sometimes scratches on polished elements and strain of rubber parts, also pay attention to the quality of threads. Mounting begins with accurate layout of all siphon elements, in the order and position in which it will connect. In this form, it must be installed. The transitional cuff is not an excess detail, it should be remembered that only one cuff is installed, according to the diameter of the pipe.
It is necessary that you have a detailed instruction at hand, as well as the necessary tools and materials:
- pads;
- silicone sealant;
- plastic tape;
- Screwdriver Set;
- bucket;
- piece of oil;
- rags.
Article on the topic: How to make a toroidal transformer with your own hands
General Siphon Installation Settings in Bath
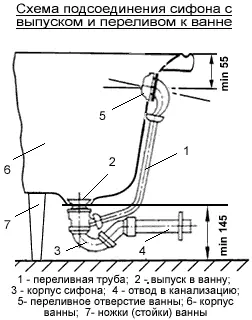
Siphon mounting circuit with release and overflow.
When dismantling the old system, the siphon and eyeliner is removed, the coupling is carefully examined and replaced by a new one, in the case of wear. The slurry and drain are thoroughly cleaned from dirt and remnants of the old sealant and temporarily close with a rag. In the upper bore of the bath, the metal rim is made to which the nozzle is attached. A drain cup is attached to the drain hole located in the bottom of the bath. To connect the siphon with drain holes, you first need to promote a metal bolt, which is located in a round plate of the bath. Then, with the help of a bolt connecting the bottle and bath nozzle of the siphon, is screwed to the hole. With the help of a drum on the nozzle, the bottle is screwed to the connecting bottle and the bath pipe. Upon completion of the assembly, the end of the corrugation is attached to the waste sewer pipe. In the process of assembling the siphon, it is very important not to lose sealing gum and other small details . After the joints are tested for tightness, you can use the bathroom.
Detailed installation instructions for siphon
The installation of rubber tapered cuffs is made in this way: before they are installed on the pipe overflow, plastic nuts should be installed, on the nozzles, and it is close to restrictive belts, higher nuts, you need to wear a cuff, wide face to the nut. Next, you need to collect two pipes in one design: F-shaped, forming aqueous shutter, and M-shaped, graduation. If the narrow portion of cuffs around the perimeter went into the socket of this part, then you can tighten the nut. When installing a siphon on the bath, it will be worth using a plastic isolent and additionally lubricate the thread with gaskets. In a directional window, overlaying overlays, one ring chain is started, while it does not clamp between the lining and enamel. The second ring is done in the rubber tube eye, then it is necessary to stretch the corrugation to the desired length and install the exhaust and overflow pipe on it.
Article on the topic: How to decorate heating pipes
The standard setting of the bathroom siphon implies the use of plastic nuts that need to be firmly tightened with their hands. Before installing all rubber gaskets, it will not be superfluous to cover them with silicone sealant. Particular attention should be paid to the angular sinus between the top side and the horizontal plane, and in places where the gaskets are joined with the bathroom. A double rubber gasket is necessary to be more reliable to install and fix the top of the outlet side, and put the flat gasket on the overflow nozzle around the retainer's paws. Applications of the retainer is relevant if the bath has thick walls, for example, cast iron. If the bath has thin walls, then a semiring of the retainer needs to cut a little paws, slightly above the installation feature. The completion step of the installation of the siphon is the compound of the exhaust pipe with the water shutter nozzle.