
Table of contents: [Hide]
- Safety in the crib do it yourself: Patterns
- Bumper in the crib do it yourself: Tailoring
- Finishing stage of work
In order for the baby, learning to walk in his crib, did not hit the rod when falling, use soft bumpers or sides on the crib. They can be purchased at any store of children's goods, but easy and to sew fires in the crib with their own hands.
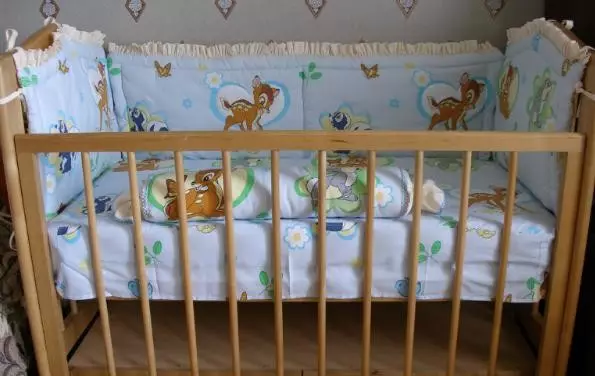
The homemade side is made of fabric and syntheps.
The generally accepted and most common sizes of a crib for children: length 120 cm, width 60 cm, height 55 cm. Taking as a basis such dimensions, can be calculated how much material will be needed to sew sides in the crib, and what other tools will be needed:
- fabric 3.6 m;
- Covenate locks 40 cm, permanent, 4 pcs.;
- Porolon 1-3 cm thick, 2x1 m.
Fabric can be taken any. The main thing is that it is tight enough. It is also desirable to use natural fabrics for children. It can be flax, hawk, sitheria, flannel. It is preferable to use fabrics with a bright interesting kindergarten.
Natural fabric, before coloring and sewing, you need to wash or at least try to try a hot iron with a ferry processing.
This is due to the fact that natural tissues, especially flax and sither, are very susceptible to shrinkage, i.e. Reduction and compression after exposure to water or hot steam.
Safety in the crib do it yourself: Patterns
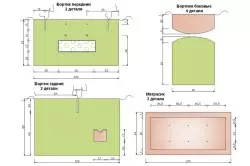
Pattern of Fortikov
You will need two pairs of different sizes, but the same in the height of rectangles and narrow strings.
To begin with, cutting the fabric fold in half along, the edge with the edge. The edge on the canvas is called the sides of the fabric that do not appear and most often are from the sides. As a result of folding, a rectangle must form, the dimensions of which are 360 x 75 cm.
Article on the topic: Interior of the kitchen and dining room from IKEA 2019 catalog (20 photos)
In order for the sides to provide a crib with their own hands, transfer markings on the fabric, making it on 4 rectangles: 2 with a size of 120 x 52 cm and 2 more about 60 x 52 cm. Scholol fabric with special pins and putting markup with chalk, rectangles cut off, leaving the allowances on Sews are 1-2 cm. In the residues there will be a piece of unimpressed tissue with dimensions of 360 x 46 cm, the strings are cut out of it and, if desired, decor elements.
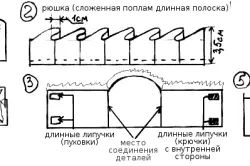
Make your own hands patterns for ties is not difficult. For this, the fabric is cut into strips 46 cm long and 4 cm wide. There will be 22 pieces of such bands. After cutting, each strip folds along and loads.
Back to the category
Bumper in the crib do it yourself: Tailoring
Bumper scheme in the crib.
Sewing begins with strips: they are stitched along the edges of a zigzag on a household sewing machine or process the edges of overlock when presented. It is necessary so that the fabric in the edges does not appear, thereby reducing its strength. I stitched all 22 strips, they must be turned and stroke, prepare for further use.
Then, to decorate the sides of the bed and close the visual joints between them, you need to carve ruffles from the rest of the fabric and seduce the edge of the side. To do this, we need a strip of 10 cm wide, maximum length. In length, all the resulting strips are connected to each other. Stitching, fold along, the front side is outward, and fasten the pins, smooth the iron in this position. The edge is flashing on a typewriter by an ordinary line, while at the same time laid on the folds of the folds so that it is more convenient to sew them to the sides.
After that, the sides themselves begin to sew in the crib. The edges of rectangles immediately before crosslinking are processed by a zigzag or overlock to prevent the tissue sprinkling. In the event that there is no function of a zigzag line on the sewing machine, the edge of the fabric can be processed by the subhead. For this, all the edges, except the edge, are coated on the wrong side of the fabric by 5 mm, and then another 5 mm in the same direction and thus stitched. In order that in the process of sewing the bending, it is not straightened, it makes it difficult to work thoroughly, it is carefully stroked with an iron, fixing in the resulting position.
Article on the topic: We go to choose Tulle in Lerua Merlen: Instructions for beginners
The edge of the tissue, if it has aesthetic appearance and keeps the thread, can not be processed in this way.
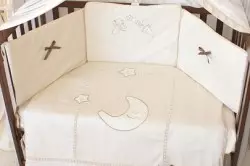
Bathers with their own hands is a beautiful elegant and inexpensive bed solution.
After all the details are processed and ready for assembly, they take two parts of the same size. The first rectangle is put on the front side of the face. Ryush is put on it, their treated edges should look in one direction and be combined. In the middle and in the middle there are strings folded in half, the place of bend is put on Ryush, the ends should remain free.
Then a zipper, a slice in the same way as the cloth with Ryush, is then put on Ryush. Lightning stacked in a fastened position, face down.
So that in the process of sewing the parts did not shift and the lines were smooth, all layers need to be knocked out with a thread or led by special thin pins.
The edge of the second rectangle is bends, and zipper is added to it using a pin or fixed in the desired position using a surge.
All layers are embedded on a typewriter along the pin or the line of the surge, and there is a ruff on the front side, a lightning and ties dog. The upper and side parts of the rectangle are stitched similarly, but without zipper. After that, the finished cover for the side can be turned up by the front side by opening the zipper. The foam rubber is cut gently into pieces of the required size and is placed inward, lightning closes.
Back to the category
Finishing stage of work
The remaining flights are sewn similarly, and after the readiness of all 4x, you can mount the prepared fences in the crib from the inside with the help of ties.