
After the walls are completed, the ceiling, electrical wiring and cable were carried out, the floor covering was laid, you can start the installation of the plinth. The time has long passed when people with fear were going to change outdoor coverage in an apartment or house with their own hands. Now, in order to decide on such a responsible event, it is enough to have a small snack and have a phased detailed plan to eliminate subsequent repairs due to the shortcomers.
Before the fill, it is necessary to close all the cracks and the depressions, remove the unnecessary tubercles.
If anyone else comes to keeping any work related to laying tiles, laminate, parquetwood, linoleum to the surface having irregularities and roughness, i.e. Unprocessed option, then it will be a waste of money. Who wants to walk on the floor, which literally tries to disperse?
That is why after laying the main layer and primer (if desired, concreting can be carried out), you can go to the third stage - this is the finish fill of the floor.
Preparatory process
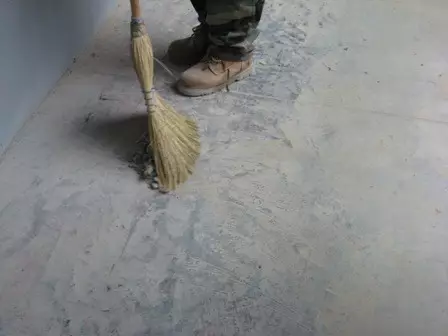
After work related to the removal of the previous coating, the floor is pre-cleaned from dirt and garbage. This is an indispensable condition.
Having embedded all the depressions and cracks, it is necessary to remove unnecessary tubercles.
Floor device: Pouring, alignment and screed.
The plane is divened with a vacuum cleaner - the more intense, the better.
As for the primer, it gives:
- Practically complete absence of dusting and the occurrence of light bubbles;
- optimization of complete water absorption;
- The presence of greater adhesion;
- Reliability of the plane of the cause and straightening layer.
Full alignment is selected depending on the differences, noise insulation, timing and type of floor coating itself.
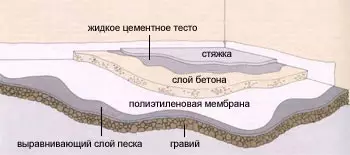
Sand-cement floor screed
Polymer-based screed. One of the most common methods for reliable and high-quality alignment of the floor is precisely the cement screed (but on the basis of the so-called wet method). A more comfortable design, based on the price and quality ratio, is a solution that is operated on a special polymer base and consists of a ratio: 1 cement bag, 13 sand and PVA instead of water in a ratio of 1 to 4.Article on the topic: Kitchen transfer principles in the living room
It can also be used for drop valves, starting from 5 cm in fact for all types of flooring.
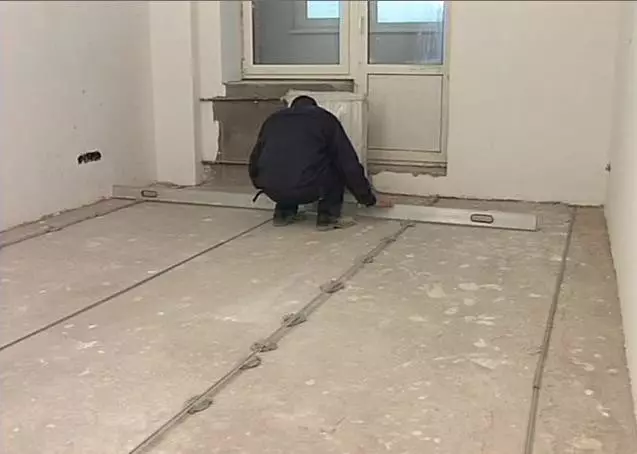
After preparing the base, it is necessary to immediately start marking for accurate and uniform setting of outdoor beacons. Their main task is to be so that the coming concrete flooring is flattened and smooth when laying. Marking makes using self-tapping screws using a water or laser level, or an elementary old method - pull a simple fishing line.
After graduating with marking, they begin to put forward the presence of beacons. Such elements are special T-shaped trading, or iron rails.
Dry outdoor screed
Before starting the floors, it is necessary to completely clean the base.
The dry screed is fully suitable for absolutely all flooring and still owns quite a good soundproofing, and the difference in the value of at least 4 cm.
The calculated plane is mainly fill with the most ordinary polyethylene film with a width of 50 cm. The stripes of the film must necessarily fit with the allen at 100-200 mm. And at the same time it is still necessary to launch directly on the walls, but it doesn't need much - literally 100 mm.
Accordingly, the introduction of lighthouses is really not foreseen and not necessarily foreseen. But they have all the chances of helping to help you - with their help, it is possible to sharpen the clayzit, and they can also simplify the number of works associated with the layer height. In such a situation, the introduction of special and sufficiently available profiles (P-shaped) is recommended - they must be laid down the profile down, then they are smoothed and fixed, and all empties in the semi are covered with ordinary clay.
This process is quite simple and does not require certain skills, despite the fact that the benefits carry quite large.
Article on the topic: Natural linoleum: What it is, reviews about eco composition, photo and laying of materials
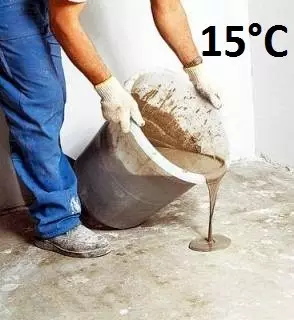
When filling the floor, it is necessary to adhere to the temperature regime 15 ° C.
After the frosting of the claymzit material, they begin to gradually add the presence of gypsum fiber elements (GVL). Their consistent combination and bonding with special cone-shaped screws directly on the edges. Due to the use as an additional binder (PVA), the sheets have the most strong and reliable clutch between themselves, transforming into one - a completely even floor layer. To fold such sheets is very neat.
The works finish with the process of primer the floor with their own hands: initially the joints of the sheets of GVL sheets, as well as the fastening of the screws, then the entire plane. Based on the level of the screed, the extension of the edge tape and unnecessary cellophane is extremely neatly cut.
Fasting, the frozen flooring will form a strong and very thick and smooth layer, but it is simply impossible to use it without flooring. Since being not protected, their external plane has an excellent opportunity to absorb water and oil, "dust" and so on.
The primer is better to take the compositions that are designed for straightening mixtures.
The mixture is prepared exclusively by general annotation, which is written on the package itself - and absolutely any deviation from it can actually lead to extremely unnecessary and complex results. For high quality and active stirring, it is allowed to use an electric drill with a special nozzle. Probably, this is the easiest way to get a homogeneous mass without lumps. The properties of the mixture can be maintained only from 10 to 20 minutes (the exact time of activity is seen on the packaging of the solution itself), therefore prepared it with certain doses.
After successful fill with this mixture at the end, they specifically "pass" by the ordinary needle roller.
Tool required for work
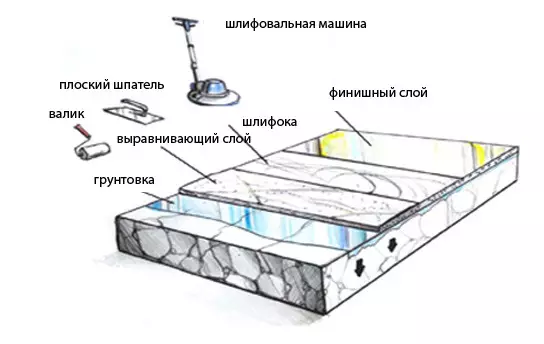
Floor Filling Scheme.
Like any building process, this also requires the attraction of additional equipment. This will not only facilitate work, but will also help save extra time. The main tools are:
- drill;
- hacksaw;
- screwdriver;
- self-tapping screw;
- level;
- roulette.
Article on the topic: How to glue 3D wallpaper: Important moments and recommendations
It is important to remember that this process is quite time-consuming, which requires certain skills and knowledge from the worker. Therefore, for this, it is, of course, it is better not to take.
The optimal option will entrust this work to highly qualified specialists who have repeatedly performed this procedure.
However, many for the purpose of savings are carried out this process and independently. And it is right. If you follow all the recommendations and comply with the sequence of your actions, you will get a great result. Good luck in repair!