
Starting repairs, many want not only to change the appearance of the walls, ceiling and floor, but also make redevelopment. Someone puts additional partitions, creates arches or openings or carry door openings to another place. Most often, the most accessible material is used for redevelopment - plasterboard. With it, you can change the apartment to be unrecognizable and give the walls and ceiling a kind of aesthetic and very clean. Any designer solutions can be performed using GCL (drywall). How to sew the doorway with plasterboard, you will learn in this article.
To sew the opening of plasterboard, you must first dismantle the doors, then install the thermal insulation and frame, after which it is plasterboard and sharpen the seams.
Of course, you can simply lay the doorway with bricks, but why create yourself an extra difficulty when there are much more comfortable materials and methods. It is quite easy to work with GLC, it does not require any special skills and skills, it is enough to prepare consultation from a specialist or read an article with accurate recommendations.
Where to start construction
Before laying the doorway, you need to make sure that you have all the necessary tools and materials.
It is better to do it right away in order to not interrupt the work due to the lack of some component. You will need the following materials:
Installation of plasterboard on the wall.
- Sheets of plasterboard. You need to choose them, considering the features of the microclimate of the apartment or the room where the repair work is carried out. Fireproof, moisture resistant, acoustic - choose something that is ideal in your case.
- Profiles guide and basic. What material they will be made is your choice. Most often perforated profiles are used, it is very convenient to work with them, they guarantee the strength and reliability of the design being created.
- Mineral wool. One of its indisputable positive qualities is the ability to withstand high temperature. At the same time, it does not lose its heat protection properties. This is an excellent soundproofer, which is used not only for the walls, but for the ceiling and floor. In addition, it has very high resistance to alkalis, solvents and oils and good water repellent properties.
- A hammer.
- Drill.
- Self-tapping screws for drywall.
- Screwdriver.
- Screws.
- Spatula, preferably two, big and small. With two will work much more convenient.
- Putty, you can also choose a ready-made mixture, it will save you time.
- Dowels.
- Macate knife or ordinary, but rather sharp.
- Primer.
- Small agricultural sandpaper.
Article on the topic: Choose and sew the brackets to the curtains: Instructions for beginners
Features of the device design
Door dismantling diagram: A - removal of the door leaf, b - dismantling of door cylinders, in - removal of mounting foam and seals, g - rods on the door frame, d, e - catching the door frame elements.If all of the above is available, you can start work. To begin with, of course, you need to dismantle the door. The door leaf is removed from the loops, it is used a hammer, and then with the help of a nail-made platbands. The door frame is also removed, perhaps you have to break it.
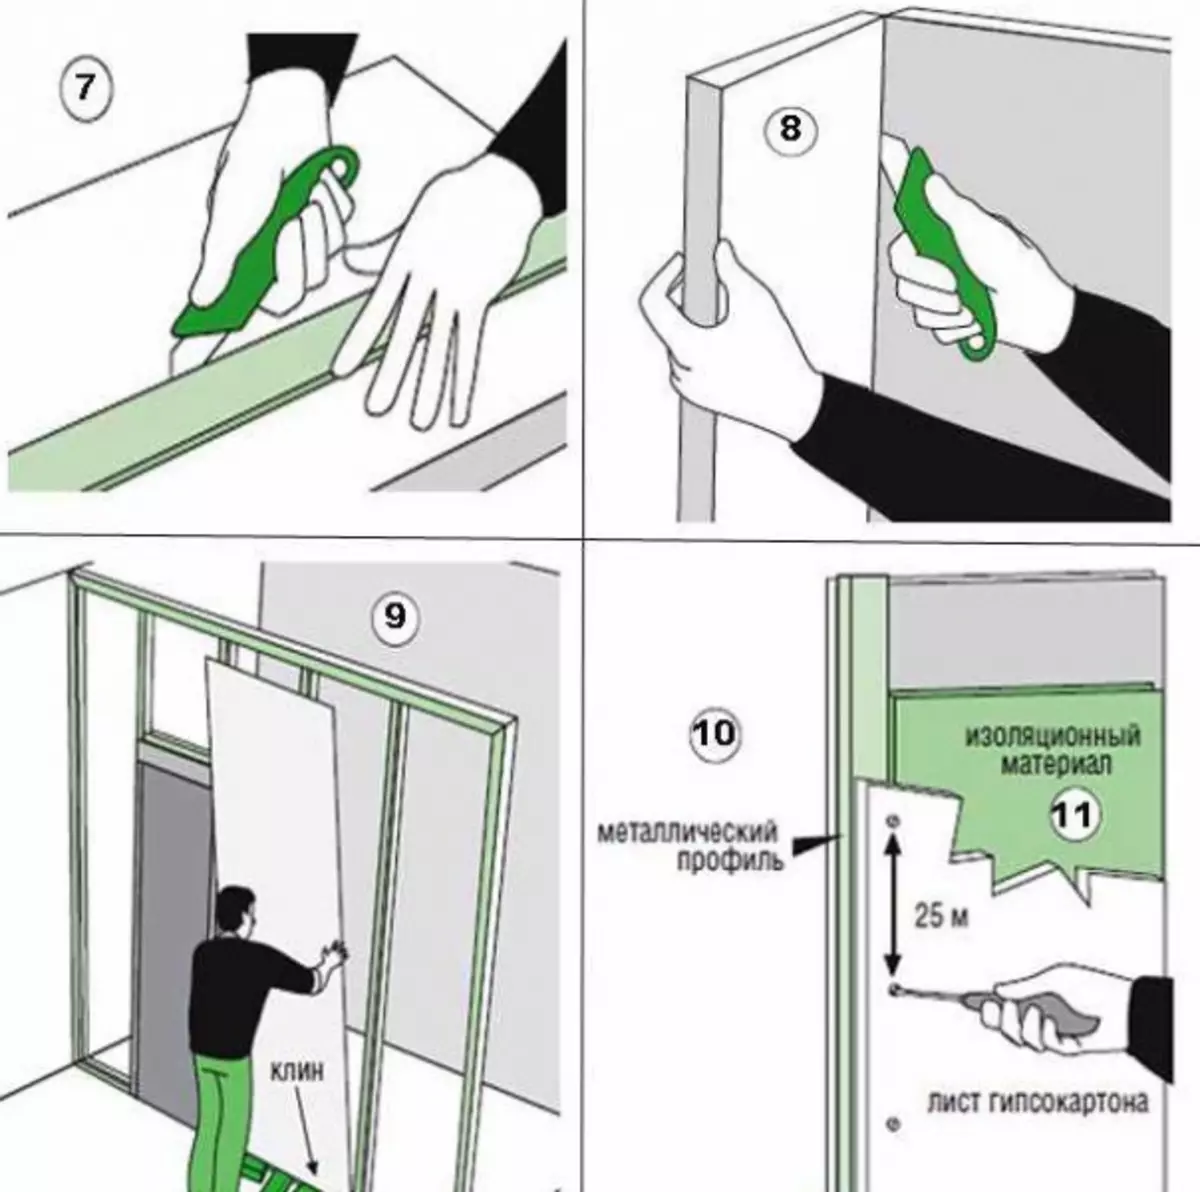
Profiles are measured and cut exactly in the dimensions of the doorway. Guide profiles on top and bottom of the opening are mounted, it is done with dowels and screws. The main profiles are inserted into the guides and are also fixed with dowels and screws.
In the same way, the profiles and on the other hand are fixed in the same order. Holding how much, you will need profiles and sheets of plasterboard, do not forget that you need to close the door opening from both sides.
Carefully measuring the desired size, cut the plasterboard sheets with a conventional dummy knife. Plasterboard cuts easily, but still you need to work carefully, so as not to apply unnecessary damage.
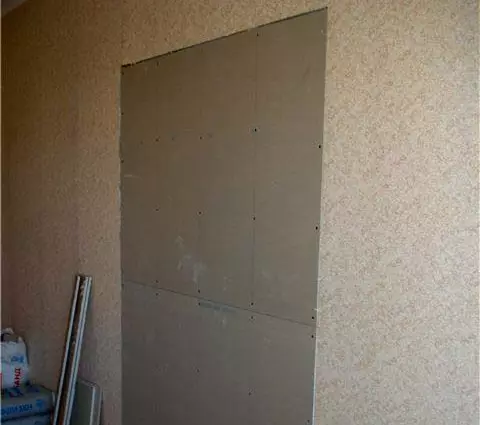
Special self-pressing for drywall, cover the GLC, attaching sheets to the framework of profiles. Make sure that the distance between the self-draws was not more than 30 cm, the implementation of this condition will provide additional strength of the structure. In this part of the work, you need to fully close the GLC one doorway.
When moving to the other side, already knowing how the doorway to sew plasterboard, do not forget about the heat and sound insulation. The framework of the profiles is paved with mineral wool, and only after that you can shelter the opening of GLC.
The next stage is a putty
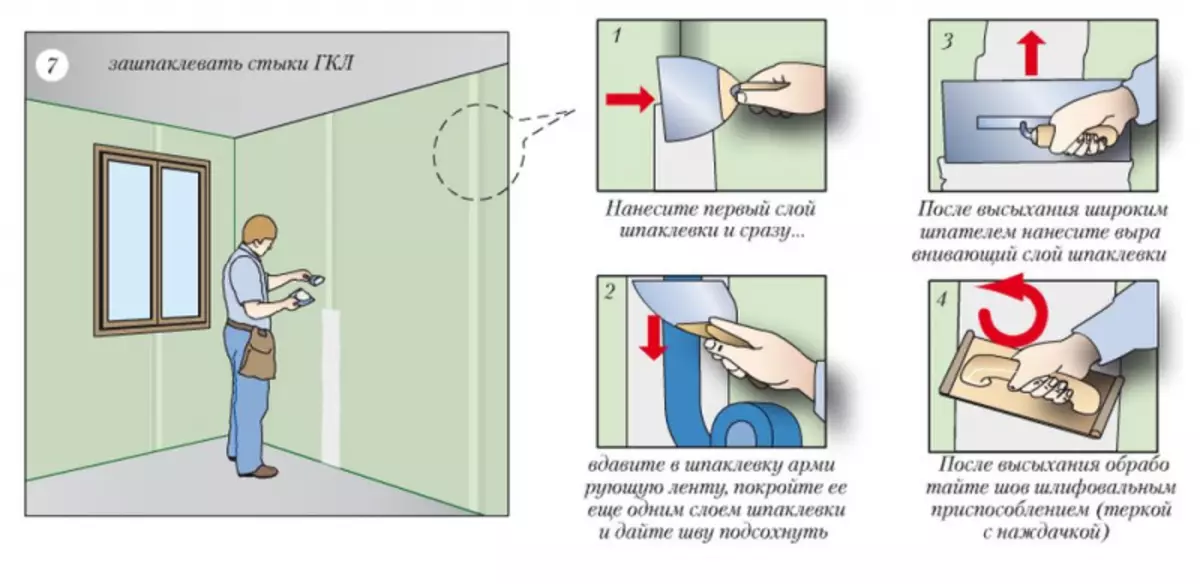
Scheme of spacing of seams of plasterboard panels for sealing doors.
Article on the topic: How to properly say putty or putty? Is there any difference in this
Go to this decorative part of the work responsibly, otherwise all your works are crowned with an uneven wall.
All the gaps remaining between the wall and partition and the place where the screws and the places of possible random damage were screwed down. After a neat application of putty, you need to give it to dry up at least a day.
After complete drying, take the spatula to the places where you applied putty. It must be done to remove hardened discover particles, otherwise it will not work out a smooth surface.
The second layer of putty is applied to the entire surface of the former doorway. The layer must be thin, carefully ensure that it is on the same level with the wall. The second layer of putty should be given to dry.
After drying the second layer, you need to handle the surface with the sandpaper. It does not take much time, and those who have a grinding machine, this work will not deliver anything but pleasure.
The only nuance - during such a job a lot of dust is formed, do not forget to take into account and put on a respiratory mask, as well as to cover the equipment available nearby, things and everything that can suffer from dust, protective film.
After you treat the surface with sandpaper, all irregularities will disappear, and the final stage will be the coating of the finished wall of the primer.