
The most efficient method that allows you to hide irregularities on the walls is the sheath of their drywall sheets, the so-called, "dry" method of alignment of the walls. Screws are used as fasteners under drywall. The advantage of this method is to reduce time and reduce the value of materials compared to alternative methods. But it also has certain disadvantages associated with the use of profiles.
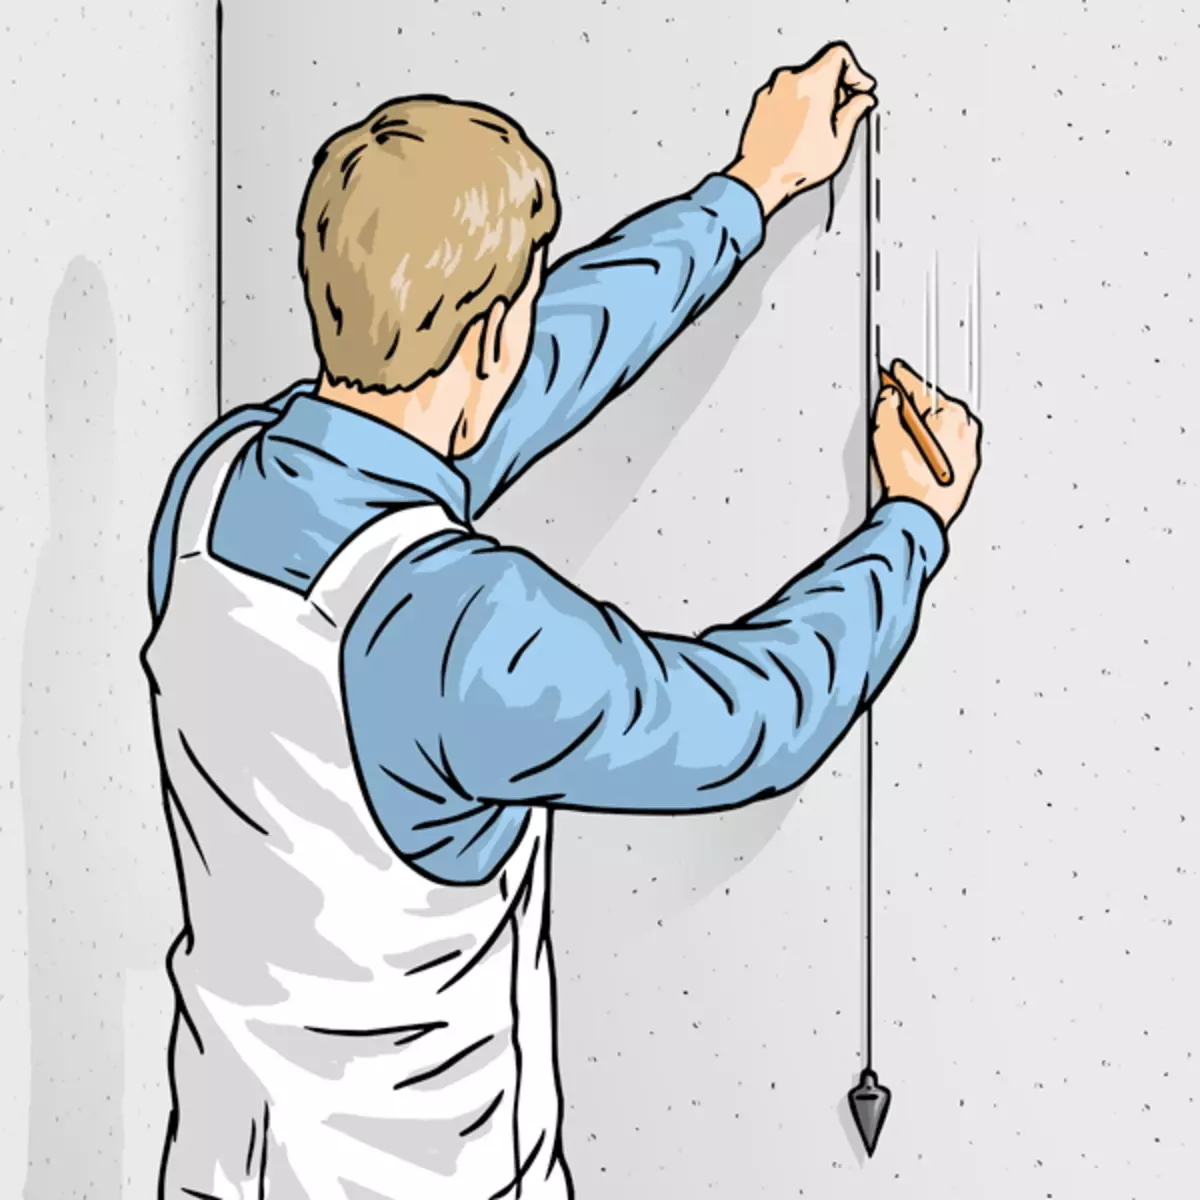
The lifting of the walls of plasterboard is the easiest way to level irregularities.
Installation of a complex system consisting of a metal profile or wooden rails does not reduce the work time, it also requires a sufficiently high qualification of the masters of the profile installer. This technology is very demanding of the accuracy of all measurements. A small error made in the design calculations is difficult to corrected in the later stages of installation. The cost of the entire system is so high that the difference between it and the "wet" method is small. Wooden rails, with which you can abandon the metal profile, allow you to reduce the total cost of materials, but they are not always easy to find on sale in ready-to-use form, sometimes additional processing is required.
Many people wonder if it is impossible to do without installing a complex fastener under drywall, especially when there are no big irregularities on the wall, for example, in a new building. After all, then you can abandon the acquisition of expensive elements and further reduce the time of work. With this installation there are less chances to make a mistake.
Common delusion
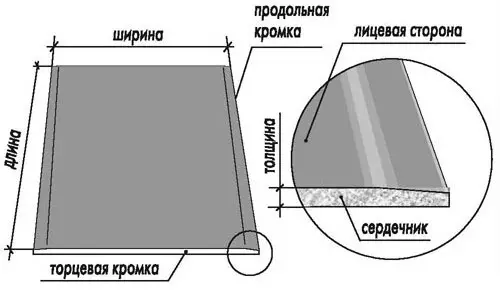
Scheme of the structure of the plasterboard sheet.
Let's just say that simply attaching the plasterboard sheets to the wall with the help of conventional fasteners instead of the profile will not work. Using such a fastener, it is difficult to make the wall smooth, and when you press it, even random, drywall will be damaged in those places where the mount is installed. A gap is formed between the wall and stove, moisture will accumulate in it, due to which the plasterboard will last much less. In no case can not be attached to mounted drywall plates to the ceiling. Such a way for example only in those situations where you are creating drywall to a wooden wall, which in our country are quite rare. There are other ways to fasten the drywall to the tree.
Some experts recommend using for fastening drywall to the wall mounting foam, but this design will be short-lived and impractical. Plates are poorly attached foam to any surface. To mount this design, it is necessary to use expensive foam, so the cost of this technology will be too high.
Right method
But still there is one method with which you can produce fasteners of plasterboard straight to the wall without using the metal or wooden profile.

Types of profiles for mounting plasterboard.
Only it is not suitable for attaching drywall to the tree. After all, there is a special glue-based adhesive and polymer additives as fasteners under drywall.
The method was called "dry plaster without profiles." Moreover, when the wall is composed of a gas-block, the installation of drywall straight to the wall is the only permissible. After all, the drilling on a gas concrete is extremely recommended: it is difficult to build an anchor to it, which will then serve for a system of wooden plates or a profile.
Article on the topic: QU high-quality chair with their own hands
What should be known before the start of work
Plasterboard sheets after the installation is completed, there will be a fully flat plane. In order for this plane to be perpendicular to the floor, it is necessary to install sheets, pushing out the largest irregularity on the wall. It is from how much this site is behind the wall plane, it depends on how much the clearance between the wall and the plasterboard system will be. Therefore, if irregularity is more than 5 cm, it is cheaper to collect a system using a profile. If such an unevenness is only one, then it can be removed with a hammer and chisel or perforator.
It is impossible to use the "dry plaster" method in those rooms where high humidity will constantly be, for example, in the bathroom. Also, this method is not suitable for rooms in which the walls are often covered with moisture. This happens if the outer wall has bad thermal insulation, such often occurs in old houses.
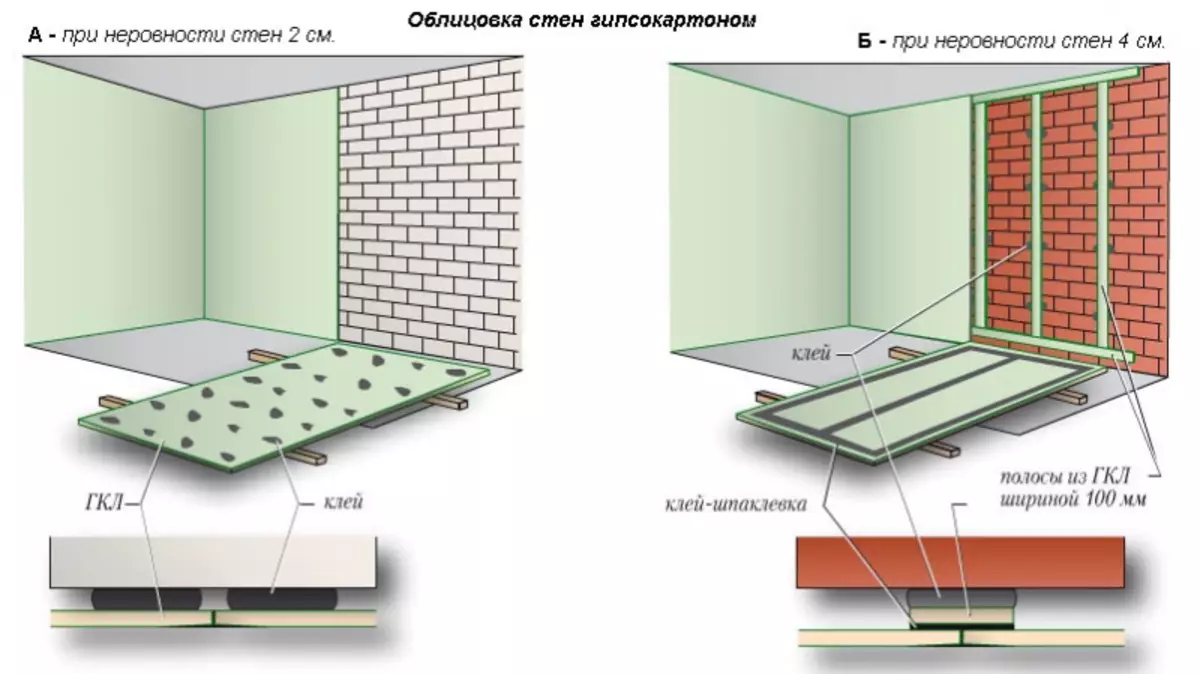
Facing the walls of plasterboard with glue.
There are two options for the "dry plaster" method: using lightacles as fasteners under drywall and without them. The exhibition of beacons takes time at the beginning of the installation, but speeds up work with sheets. Mounting without lighthouses, you will rather begin the main works, but spend more time for each sheet. It is advisable to see the compromise between the use of beacons on large areas and refusal from them when working with small separate surfaces. Installation without lighthouses requires exhibiting each sheet to the ceiling and semi separately. It is more complicated, as it is above the likelihood of a mistake. If you are not a professional builder who can make many works "on the eye" and get good results at the same time, he will not suit you.
Getting ready for work
Here is a list of tools and materials that you need. We give a list of a professional tool that may not be at the home master. After describing the tool, it is specified than it can be replaced.
Instruments:
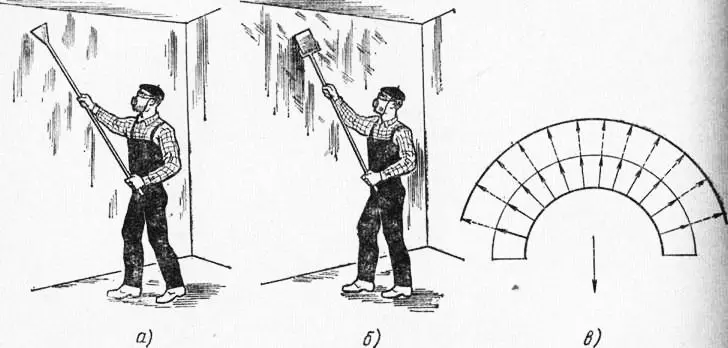
Cleaning the walls from the old plaster: A - Cleaning with a scraper; B - smoothing with a teaching or a hinge grater; B - scheme for moving the working tool.
- Cutting knife.
- Electrolovka with a special filling to quickly and accurately cut the sheets of plasterboard.
- Thread for marking. To secure a thread, we need small cloves. If you work on a gas-concrete, remember that nails need to score at an angle of 450.
- Level and plumb. Using a level with a laser pointer will simplify you work. As a plumb, you can take a small cargo on the thread.
- The container in which we will breed a gypsum solution. Suitable and ordinary bucket.
- Electrock and nozzle-mixer to it.
- A set of spatulas in which there must be a toothed spatula.
- The rubber hammer is needed for a neat alignment of the plates.
- Roulette, ruler, pencil, paper to make marking and draw diagrams.
- Rule long from 1 meter to two - depending on the size of your surfaces.
- Large wide brush and small brush for applying primer.
Article on the topic: Composted Human Hands: Pile Manufacturing Options, how to do, photo
Materials:
- Sheets of plasterboard with a thickness of 12.5 mm. With very curves, you need to take with a margin at least 10%. We work only with sheets intended for the walls.
- Glue, which will serve fastener under plasterboard. In the case of its absence, you can use a gypsum putty, in which it is desirable to add PVA glue in the ratio between 1:10 and 1:12.
- Water. Usually glue is diluted in the proportion of l water by 1 kg of glue.
- General purpose primer. Consumption Watch on the package, it can be very different depending on the manufacturer.
- Wedges made of wood with a thickness of 7-10 mm.
Preparatory work
Steps of plasterboard plaster on the wall.
If you decide to try the "dry plaster" method, you must prepare the wall. To do this, clean it from the remains of the old plaster. Well cleaning the wall, cover it in one or two layers of primer, giving it drying according to the manufacturer's recommendations. On some packages there is even a diagram of the use of primer.
The gap between the sheet of plasterboard and the ceiling, if we work without a profile, should be from 3 to 5 mm, and the distance from the sheet to the floor is 7-10 mm. Therefore, the first nail rush to the upper angle, observing the distance to the ceiling, and the second to the lower angle, also with the observance of the required distance. We stretch the thread between them, exposing it perpendicular to the ceiling with a plumb. We repeat the operation from the opposite side by checking the level of the correctness of our actions. After that, we connect nails to thread, trying to create perfect lines.
Having thus obtaining a square from the thread, with the help of a plumbing determine the degree of irregularities of the wall, only now it is no longer "on the eye", but for sure. We are interested, whether there are no more irregularities on it more than 20 mm. If there are such unevenness, it will be necessary to use a substrate from plasterboard strips, with a wide range of about 10 cm, which are secure vertically from the ceiling to the floor in places with large irregularities.
We apply a detailed markup on the wall, determining where and how the plasterboard sheets should be cut. If the distance from the floor to the ceiling is greater than the length of the sheet, then insert a cropped piece is needed in a checker order: the first to the ceiling, next to the floor. Do not forget about those places that we need to leave open, for example, about the outlet of the pipes from the wall.
It is necessary to apply a detailed markup on the wall, determining where and how it will be necessary to cut drywall sheets.
To set lighthouses, we need to pull several horizontal threads at a distance of about 40-50 cm from each other. To do this, first on one wall we drive one nail at the specified distance from the ceiling and at the level of secure it to the thread. "Usually I fix the button with the button," you will say and find yourself right, since this option also has the right to life. Then we repeat the operation from the opposite side and stretch the thread so that it is parallel to the top and strictly perpendicular to the side. For measurements, we use the level and plumb. Strong thread, check each gap.
Then, on each thread, through the gaps in the same 40-50 cm, we applied the glue with a spatula, thus exposing the cakes from the adhesive - our lighthouses, with a diameter of about 7 cm. Each lighthouse, we carry out the spatula exactly along the thread, check from time to time, check with a level, So that the thread did not change its position. After placing beacons, we wait for the complete drying of the glue. Only after that you can start the installation of plasterboard.
Article on the topic: Podium bed do it yourself: drawings and installation
If there are big irregularities on the wall, which was said earlier, slices of drywall are used as lighthouses. They will play the role of profile. To do this, cut the strip, the length of which is as close as possible to the height of our wall. We apply on them a layer of glue using a toothed spatula in such a way that the glue goes around the perimeter of a piece. Then glue them to the wall, the gap between them is 50 cm, ranging from one edge of the walls to another. Each piece align in the upper and lower thread by clicking on it by the rule, constantly checking accuracy using the level. It is also desirable to attach beacons from drywall on the upper and lower edge, accurately fetching them through threads.
If the irregularities on our wall are large, we apply glue on the plasterboard bands not toothed, but by a simple spatula, laying the glue with large portions directly to the center of the strip through the gaps, approximately 30 cm.
Installation of plasterboard plates
After the beacons are dry, you can start the mounting of the main mass of plasterboard. If you decide to do without lighthouses, you have a fairly smooth wall, you can immediately move to this stage.
Pre-cut the sheet cabarton sheets on the dimensions that we received. It must be remembered that they are mounted by that side to the Seine, on which there are inscriptions; We must remain the party on which some manufacturers draw a ruler along the edges of the sheet. If you mount them on the contrary, then it will be difficult to make their finish. Cut sheets in such a way that their vertical seams match the edges of the sheet with a notch. We try to make the vertical lines of the joints were longer, and horizontal - as short as possible.
We start the installation of plates from the bottom angle, climbing to the ceiling, then moving aside, while we use our schemes. The first sheet put on the wedges to keep the gap between the floor and the sheet. The glue is applied to drywall with a toothed spatula, imposing it around the perimeter, with an indent of 5 cm from the edge, and in the center of the sheet, so that the distance between the glue strips did not exceed 40 cm. Since we do not use the profile, we try so that the glue is applied evenly , because it will perform the role of the carrier element, with its help the stove is attached to the wall.
If the walls of the wall are greater than the teeth of the spatula, then we are applying the glue "cakes" approximately every 35-40 cm, not forgetting to indent from the edge of the plate at 5 cm. We do it carefully to get a good fastening for plasterboard. Between the plates, we leave the gaps from 3 to 5 mm.
After drying the glue, you can proceed to the processing of seams in the usual way.