
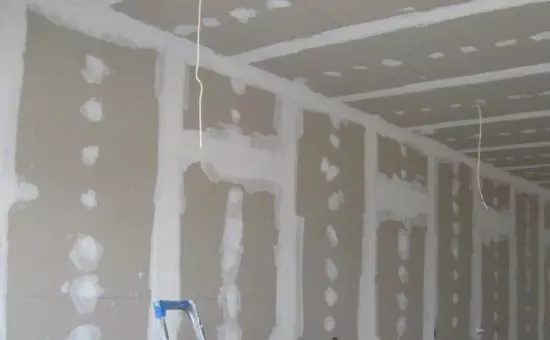
The most popular material used during repair is plasterboard. With it, you can align the walls, make niches and partitions, mount a complex multi-tiered ceiling. The main advantage of the GLC is a flat robust surface that can be painted or bonded by any finishing material. But if you managed to mount the frame and shelter his GLC, this does not mean that the design is ready for the finishing finish: a gypsum wrapper is necessary. This step will make it possible to level the seams, cracks, irregularities in the places of fastening of the screws.
If the installation work was carried out qualitatively, according to technology, then the seams between the sheets will be small, and you will be able to sharpen plasterboard without much difficulty.
We estimate the state of the surface
If the installation work was carried out qualitatively, according to technology, then the seams between the sheets will be small, and you will be able to sharpen plasterboard without much difficulty.
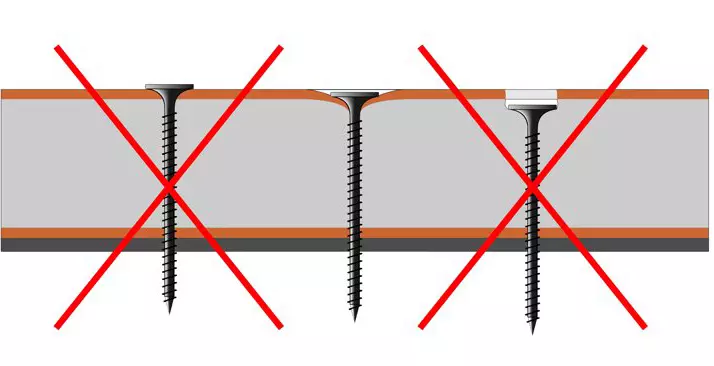
If the screws are recessed into the surface of the material more than 1 mm, then such a fastener must be unscrewed and not far from it to install the other. If the self-pressing hat drupt the GLC leaf surface, then it needs to be spinning.
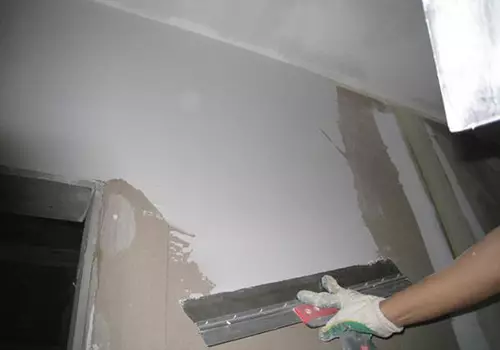
First of all, check whether the self-tapping screws are cleaned correctly. If they are recessed into the surface of the material more than 1 mm, then such a fastener must be unscrewed and not far from it to install the other. If the self-pressing hat drupt the GLC leaf surface, then it needs to be spinning. Check whether it is necessary to do this, it is possible to be quite simple: we will spend the spatula on the sheet plane. If it clings to the self-tapping screw, it means that it should be cleaned deeper.
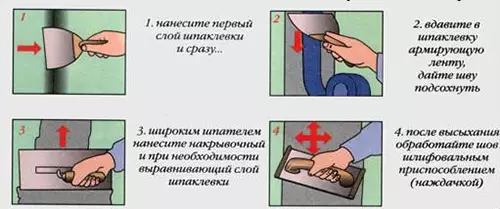
Inspecting the surface of the drywall before it is putty, it is necessary to decide which seams should be sickled by a sickle - a mesh construction mounting tape. Corner slots and those that are more than 1.5-2 mm are required for such sealing. The main task at this stage of work is to disguise the joints between the adjacent sheets before putting on the plasterboard. Sherryanka is of different widths and is made of fiberglass. By texture, it resembles an ordinary bandage. This tape is sold already impregnated with PVA glue, but if she still keeps himself a bad thing on Glk, then it will have to be additionally missed with his own hands with the same glue.
Article on the topic: Installing the freezer cameras do it yourself
Choose a mixture for plasterboard guns
Gypsum-based formulations
It is better to use them only in those rooms, the humidity in which does not exceed the norm. Shpocking with such mixtures in the bathroom or in the kitchen will lead to the fact that the seams soon absorb moisture and lose tightness. No matter what surface you will handle, ceiling or walls, your quality putty will lose very quickly.Moisture-resistant compounds
Already, one name of the mixture speaks of its characteristic: it is designed to put on plasterboard (as well as the ceiling) in the territories in with high humidity. It can be bathrobes, kitchens, cooking rooms or those that are directly in contact with the environment.
Polymers based formulations
Such a putty for plasterboard can be treated with their own hands the surface of the walls and the ceiling in any rooms. The main advantage of this mixture is that it does not require subsequent grinding. Such a putty can be sold both in the form of powder and in the form of mastic. It is better to buy ready-made mixtures, as those that are bred by water, you need to cook with your own hands.Dry plasterboard putty
Many believe that it is better to choose these compositions, since they are characterized by the stability of the composition of the components and the exact weight dosage. These wipers for drywall are durable and frost-resistant. They are incredibly durable and plastic. Their main advantage is that they can be prepared by small portions.
Putcloth of plaster walls: stages of work
First stage: primer
Primer before putting drywall is simply necessary: it will provide the best grip of the masking composition with the surface of the GLC.- First you need to remove all dust and dirt from the surface of the walls and the ceiling with the surface of the walls, accumulated on them during the repair. After that, you need to choose the primer and stock tassel for work. It is best to buy a form of deep penetration. We treat plasterboard before putty;
- How to primer GLK - not need to learn. This is a simple well-known job: to make the surface of the walls and the ceiling into the brush and miss it. Special attention will be paid to the places of fastening of the screws and the joints of the sheets of GLK. Primer before putting drywall is simply necessary: it will provide the best grip of the masking composition with the surface of the GLC.
Article on the topic: Proper installation of point lamps
Second Stage: Applying the base layer of the masking mixture
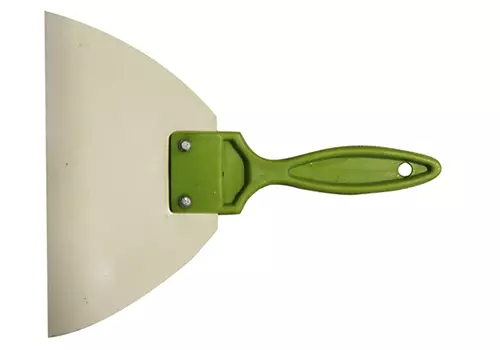
To apply the base layer of putty, you need a rubber medium spatula
- After the primer layer is driving, we begin to put the plasterboard with your own hands. In order to accomplish this work correctly, we need a rubber medium spatula. You can use with a metal blade, but it is better to buy an elastic tool. With it, it will be much easier with it with a putty of plasterboard: to rub the mixture in the seams with a rubber spatula is undoubtedly more convenient. With him and dried putty removed easier. But despite all the recommendations, which tool to choose for work, to solve the master himself;
- Dry putty for drywall is better to knead small portions. This composition tends to "capture" quickly and come into disrepair. If this happened, the putty is carefully sulfice from the tank so that it does not remain solid grades, which, with the following kneading, it will prevent a smooth thin layer on the surface of the walls and the ceiling;
- What better to use a putty for plasterboard, it's hard to say. The mixtures of well-known manufacturers can be recommended, which produce high quality compositions: Rotband, Fugefühuller, Knauf, Glike, hyposlert and others. Such a putty will last for many years, not cracking and will not get out. If the primer of the walls and the ceiling was performed qualitatively, the composition is firmly strengthened into the GLC and in drying during the subsequent grinding, the putty will be removed gradually, layer behind the layer. This will obtain a qualitatively aligned surface.
Features of the processing of complex surfaces
If errors were allowed during installation or it was not accurately made, and the surface of the walls and the ceiling is shot by cracks and other flaws, putty for drywall will have to be used several times.
- If errors were allowed during installation or it was made not carefully, and the surface of the walls and the ceiling is shot by cracks and other flaws, putty for drywall will have to be used several times . Its application in this case should be layered in order to properly disguise all the errors made in previous works. Here, a thorough primer becomes particularly important here;
- Putty, which fill the seams must be sealed in them with a spatula. It will be right if you do it as follows: the first layer is pressed into the slot, and after drying it, repeat the shtatlevation. If it became noticeable that the quality of the mixture leaves much to be desired, and it gradually chokes up, then re-primer surface will come to the rescue. In this case, its application must occur on the first layer of putty for drywall. If you need to align sufficiently deep dents or cracks, you have to impose a rather thick layer of the mixture. Specialists are recommended for drying each of them thoroughly primed. This will significantly increase the grip and the strength of the masking coating.
Article on the topic: Mosquito net do it yourself for 72 rubles
Third Stage: Finish putty walls of plasterboard
The putty of plasterboard under painting is made with special care. In particular, if it is decided to use a glossy coating. It, due to the refraction of light, will reveal all the flaws in the surface finish. Therefore, the plasterboard is very good.
- If the quality of the work suits you and the mixture tightly closes all the slots, before grinding the surface you need to hold another one, the final stage of the work. We will need one of the finish putty for drywall. In order not to make a mistake in the choice when buying, you need to carefully read the inscriptions on the packages or ask the seller about what kind of mixtures are preferred;
- Then your hands will prepare the composition, after which the completed putty of plasterboard is made. During its execution, the mixture is applied a thinner layer than previous ones. Make it is quite simple, as such a putty is much softer. If you use a rubber spatula, then it becomes much easier to work;
- The putty of plasterboard under painting is made with special care. In particular, if it is decided to use a glossy coating. It, due to the refraction of light, will reveal all the flaws in the surface finish. Therefore, the plasterboard is very good.
Fourth Stage: Grinding
For these works, there will be a grinding mesh with a special device holder. This tool is quite inexpensive, and sold at any building materials store. Grids are bought in the same place. They are different: with mats of large, medium and small. After putty dry, you can handle the surface with a coarse grid. But it is recommended to finish the work that the smoother of which is the smallest. Such an approach will allow you to get a perfectly smooth surface, which even after covering its glossy paint will delight the owner with the quality of work performed.