
Before installing the mixer in the kitchen with your own hands, it is worth understanding the features of this process. If something is done wrong, the risk of leaks appears. Properly performed installation of the mixer in the kitchen provides its assembly, mounting on the sink and connecting to hot and cold water sources. If the tap in the kitchen was already installed, but broke, he first will have to be dismantled.
It should be remembered that before installing the crane, it is necessary to overlap the water supply to the apartment.
Required tools and materials
The installation or replacement of the kitchen mixer is performed with your own hands using the following tools and materials:- a set of horn keys;
- Long end key at 11;
- adjustable key with flat faces;
- Screwdriver Set;
- Passatia;
- liquid for unscrewing bolts;
- lighter;
- tape FUM;
- linen;
- Olife;
- Food lubricant;
- The mixer itself.
Preparatory work
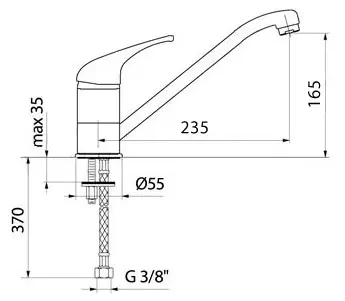
The diagram of the size of the mixer.
If the installation of a new kitchen mixer is performed on the place of the old one, it must be removed first. If there is one crane in the kitchen under the sink, and the second crane overlaps hot water, the mixer setting will be as comfortable for you and your loved ones. In this case, water can be blocked directly in the kitchen, and the toilet and washbasin in the bathroom will function. Otherwise, to replace or install the mixer in the kitchen, you will need to close the introductory crane on the apartment riser and do some time without water.
A person for whom the installation or replacement of the kitchen mixer with his own hands is unusual, it may face the first difficulties already at the stage of dismantling the old instrument. The fact is that the threaded compounds under the sink often zakuat and not unscrew.
Perform work will be much easier if you remove the sink together with the mixer and thereby provide free access to all connections.
To properly remove the sink, disconnect its siphon and nuts of the flexible eyeliner to the old mixer. These connections are not subject to zaking and should be easily unscrewed. Then you can remove the sink itself from the mounts.
Article on the topic: Smokehouse in the country with your own hands
Now there is a good review and access to the mixer fastening to the sink. If the nuts do not want to unscrew, they can be treated with one of the special liquids to unscrew the threaded compounds, when it can be used, you can use brake fluid, castor oil, they are similar to their compositions. Sometimes it helps to carefully warm the connection with an ordinary lighter. In any case, it means a lot of convenient access. If the sink is to remove problematic, dismantling and installation will have to be performed on the place, that is, lying on the back in a dark and uncomfortable place.
Assembling device
Mixer design scheme.Usually, new faucets are supplied with already screwed crane and cartridges. Sooner or later they will have to be changed or serviced, most likely with their own hands. But to unscrew this item in a couple of years it will be very difficult. Therefore, it is worth taking care of it now. Do not be lazy, remove the crane and cartridges and lubricate the thread of the food lubricant. If it is not, you can use any other lubricant. But then before using water from the mixer it will need to rinse with good pressure.
Installation of all vehicle water connections that do not work under excess pressure are performed by hand, without using keys, it eliminates the likelihood of damage to the sealing rings and gaskets. So fasten the spin and retractable shower. Installation of compounds operating under additional pressure must be performed using keys, but in this case, excessive effort should be avoided. Flexible lining or needles hoses It is advisable to install on the mixer using FMUD or linen tape. The latter is lubricated with oil.
It is necessary to perform the correctly assembly in the following order: first perform installation of a flexible liner with a short thread, then with a long one. If you plan to install a mixer without a flexible eyeliner, then you need to install special transition needles. One of them is straight, the other with a bend. In order to orient the curved needle in space correctly, you need to try it alternately to install it into the holes for hot and cold water. At least in one of them it must be mounted outside and from the wall. In addition, a complete stilette is screwed into the catering plane of the mixer. It is advisable to pull it up with passage.
Article on the topic: Ideas for drying linen in the apartment without a balcony
Performance
Scheme of replacement of the old mixer.
Before installing the mixer on the sink, in the groove on its batch plane it is necessary to install a sealing ring. Then the eyeliner and the studs are fought in the hole in the sink. Installation is performed using a horseshoe rubber or plastic laying and a metal strip that you need to install on the back side of the sink on the heel and tighten the nut. The nut is more convenient to delay the long end key. The horn keys lack amplitude due to the proximity of the elements of the shell and lining hoses or needles. On some models of mixers you need to install two studs.
If the installation of the mixer is performed directly on the sink installed on the washing, it is more convenient to install with an assistant, which must hold the mixer from above in the desired position. It is important to correctly establish it relative to the hole in the sink, otherwise leaks are possible through the gaps.
There are also other versions of mixers. It is more convenient to install a mixer with a large bottom nut and threads on the diameter of the hole in the sink. Such a mixer does not require accurate positioning. It takes place in the middle of the holes due to the design. The bottom nut is simply delayed with their own hands without keys.
When the mixer is secure and correctly fixed on the sink, you can put it in the working position. Then every nut of the flexible lining is screwed into its crane under the sink or the installation of metal-plastic pipes to the mixer's needles. Before winding the flex cell nuts, make sure that the gaskets in the connection are available. On some models they can fall out. Nuts are tightened by a horn key on a 24 or adjustable key with a small force on the key handle. The generally accepted location of water supply is the supply of cold water to the right, and the hot left.
After installing the siphon, you can alternately open the crane on the cold, and then hot water and make sure there is no leakage. It is convenient to do, rubbing the joints to the toilet paper. Do not confuse the leaks with condensate. It does not appear immediately, but after leakage through the mixer of a certain amount of cold water, more often in winter.
Article on the topic: Embroidery cross landscapes of large sizes: Schemes for free, sea and winter, urban and rustic, small monochrome, sets for autumn, summer and spring
Now you know how to install the mixer in the kitchen. The main thing in the process of performing work is carefully monitoring the placement of sealing elements and the tightening force of the compounds. And then the installation of the mixer in the kitchen will pass quickly and without negative consequences for you and your neighbors below.