
After the wall decoration, the ceiling was performed, the electrical wiring and cables were carried out, laminate or parquet were laid, you can start the installation of the plinth. Currently, a laminate is one of the most common and frequently used materials, as it is quite practical, high-quality, relatively affordable and not whimsical material. Some use it as a temporary flooring. In this article, we will examine in detail how to put the plinth on the laminate, what are the features of the work and what is necessary for this.
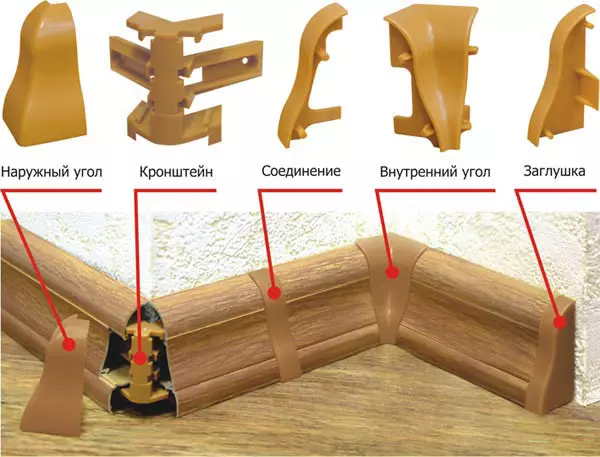
Elements for fastening plastic plinths.
Choosing a plinth on laminate
In order for all the elements of the decoration in the room look well and harmoniously, you need to be able to choose them correctly. This is fully concerned and plinth. To date, according to the material of the manufacture, it is divided into three main groups:
- The first is made of plastic.
- The second is from MDF.
- Third - from a natural tree.
Laminate is actually the most ordinary wood base that has a solid wrapper. Moisture can be destructive solely on the sides. Laminate should also be completely dry all the time. If you have inadvertently poured any liquid on it, it should be immediately eliminated. Most often on the laminated coating packaging, there is an ordinary marking that speaks about where it is worth stacking the material you purchased (it is necessary to pay attention to it in the hypermarket).
According to specialists engaged in the manufacture and implementation of this type of product, the most popular is the plinth, made from various types of plastic. This is explained by the following factors:

Diagram of a plinth device.
- It is well harmonized with different floor coatings, including laminate. Especially if the plinth imitates natural wood.
- The design of plastic plinth can provide masking of wiring and cables.
- It has a good appearance.
- It has good performance properties (high moisture resistance, not deformed when the temperature is oscillations indoors).
- Affordable price category.
Article on the topic: Mosquito net do it yourself for 72 rubles
In second place in popularity there is a plinth made from MDF. Such products also have a number of advantages, among which it is worth noting a beautiful texture, high resistance to light, ease of installation, and so on. The main disadvantages of the plinth of MDF can be attributed:
- a fairly high fastener price;
- Disabled.
Plinth from a natural tree, of course, is the most environmentally friendly and expensive.
In addition, its installation is the most complex and requires a practically perfectly smooth wall surface. Otherwise, even small irregularities and defects will be visible to the naked eye. Therefore, this type of plinth is applied as often as the first two.
Various installation technologies for laminate plinth
- On glue.
- Using self-tapping screws.
- On special dowels-nails.
Attention should be paid to such moments:
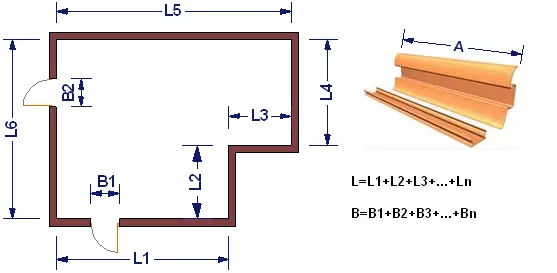
The scheme for calculating the required amount of plinth.
- When buying a plinth, it is necessary to check their complete set. The standard set includes corners, end plugs and connecting elements.
- If the laminate is used as a temporary flooring, then laying (laying the plinth to laminate) you need to fasten the wall. In this case, it will be much easier to make it dismantling.
- If the long-term use of the laminate is planned, then the plinth can be put on special glue, liquid nails using clips (for models of softless cavities). In this case, the wall clips are screwed into the wall in 30-50 cm increments.
- Installation of models with internal gutters is carried out simultaneously with the laying of cable in them, the location of which should be slightly lower than the level of self-tapping screws.
Stages of installation of fnethoods on laminate
You need to know that putting the plinth on the laminate should be started from the angle of the room clockwise. First you need to install and secure the basis on one (first wall), then the stamps of the dots under the tapping screw. After that, work in the following sequence:- Drill a hole.
- Install the plinth.
- On the previously made markup, screw the screws.
- Making a strip and set the connecting elements.
- Secure the subsequent element. This is done by braziness.
- On all the plinths to install the plugs.
Article on the topic: Popular interior styles with photos and description
An important rule: carrying out the installation of the connecting elements, the experienced masters advise not to delay the self-tapping screw, since at the same time the plinth can be deformed or even crack. It is recommended to produce finishing tightening after the final installation and fixing all elements.
Several useful tips
- Before buying a plinth to laminate, you need to carefully calculate the amount of material required, taking into account the corners, niches, openings and other features of the planning of the premises.
- The cutting of the plinth is better to perform with the help of a grinder, manual hacksaw or an electric bike.
- If the surface of the wall on the floor is close to ideal, then the installation of the plinth can be carried out on liquid nails or special glue.
- If the defects or irregularities of the wall at the floor are found, they need to be eliminated even before starting the flooring.
- When buying plinths, it is recommended to check each set to match the colors of the product itself, its components and additional accessories.
- In places of connection, the plinth must be confused at an angle of 45 degrees. It is best to do with the help of a grinder and an electrolovka and a special device for cutting materials at an angle.
- Putting the laminate plinth, taking into account the physical properties of the floor covering and the features of its laying. First of all, it concerns the properties of the material to narrow and expand under the influence of air temperature.
- Shock drill with drill set or powerful perforator;
- hand hacksaw, bulgaria or electrolybiz;
- screwdriver;
- Special fixture for trimming the plinth at an angle of 45 degrees;
- self-tapping screw;
- roulette;
- level.
That is why in order to prevent the laminate deformation, its installation is carried out, leaving small gaps between the wall and the material, and the plinth is attached only to the wall, and not to the floor covering.
This is done so that with the expansion of the laminate can calmly go under the plinth, as the planting of the plinth is very rigid and is carried out with a hammer blow. It must be done using rubber lining, dense tissue and other material.
Plinth laying tool
It is important to remember that this process is quite a time-consuming, requiring certain skills and knowledge from the worker, so on your own for it, of course, it is better not to take. The most optimal option will entrust this work to highly qualified specialists who have repeatedly performed this work.
But if you finally decided to put the plinth on the laminate, then you need to follow the conditions for their laying, without adding anything.
Article on the topic: Installation of waterproof with your own hands: Montage of chipping for the roof, how to make it yourself, video