
Increasingly in apartments and houses began to install systems of warm floors. The power of such a system can be adjusted manually, which greatly facilitates its operation. However, to install a heating element, you need to know how to pour a warm floor with concrete.
Electric floor mounting scheme.
Types of warm sex
The correctly installed floor heating system will avoid the unpleasant feeling of the cold in the winter. When the cold air masses are lowered down to the floor, it can lead to frequent colds. But even knowing how to pour a warm floor with concrete, you must first decide on its view. There are the following types of warm floor:
- water;
- electric.
Both options are accumulated under the concrete fill. The water floor is installed under the screed using the top floor covering. The electric heated floor is installed using the materials that are selected depending on the installation site and communication wiring, for example, cables, pipes, upper flooring, etc. To pour a warm floor with concrete, there is a special mixture that is added to the fill To improve the thermal conductivity of the coating.
Water warm floor is usually installed in private homes. Electric - in houses with central heating. This is due to the fact that it is difficult to connect to central heating.
To fill water underwear, it will be necessary:
Water warm floor scheme in the house.
- cement and sand for the preparation of the mixture;
- Isoplen;
- damper tape;
- plasticizer;
- reinforcement grid;
- solution for grouting seams;
- Long plank;
- rule;
- concrete mixer;
- mortar packaging;
- Level gauge;
- Various spatulas.
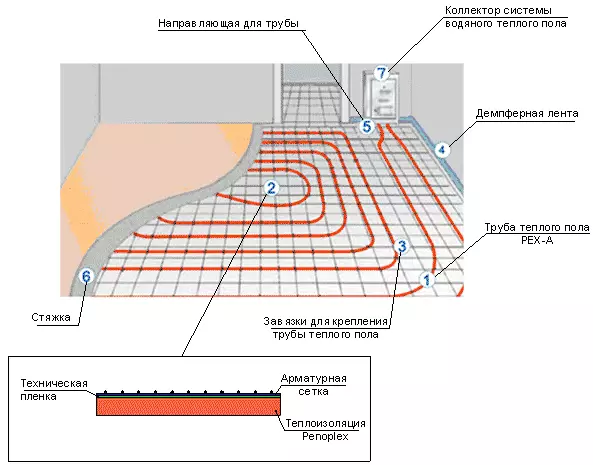
After the base was prepared (insulated and waterproof), work on laying and connecting pipes to a thermal source. After completing the laying, the pipes are checked for the thermal element and the reliability of the compounds. If the conductivity is satisfactory, the fill process begins. To strengthen the concrete layer, the reinforcing grid is stacked on the pipe before the fill. For a thin layer, polymer fiber is applied.
Article on the topic: How to make a beautiful calorie from organza yourself?
Territory for the fill is divided into several sections. The number of sections depends on the area of the concrete room. This is done for several reasons:
- so that the flooded plot is easy to lease and not to get up on the finished floor;
- It also creates a zone of temperature compensators, which prevent climbing concrete when the temperature drops; There are gaps that are filled with a special mixture between the walls of the wall and concrete.
Additional mixtures and materials
Water warm floor without a screed.
Temperature seams near the walls are filled with damper ribbon or isople, which is used instead of an elastic mixture. If the seams come across fragments of pipes passing in this place, they must be additionally wrapped with sections of plastic (metal) pipes or sleeves.
Now you need to choose a solution that will subsequently float the warm floor. To do this, you can go to the store and buy a ready-made dry mix there. Now in the construction market there are a large number of compounds for the fill.
But if the fill of the warm sex will be carried out by concrete solution, then it should be known that it has a low thermal conductivity.
For this reason, pure concrete is better not to use. To improve the clutch, the concrete preparation material is better to sift and leave fractions in size in 3 - 7 mm.
In addition, a plasticizer should be pouring into the prepaid solution, which will increase the plasticity and thermal conductivity of the screed. The plasticizer is poured into the finished solution. This will prevent his cracking during hardened. The solution with the plasticizer will need less than the usual. This will reduce the thickness of the coating from 7 to 3 cm.
Step-by-step instruction
When the warm floor system is prepared and the solution is mixed, it is possible to fill with its concrete. Pouring with your own hands at temperatures from 5 ° C and above, otherwise the concrete brand will not correspond to reality, and it can start crumble at any time. The thermal element in the pipes should be under operating pressure. This is necessary so that the concrete does not deform the pipes, and the pipes, in turn, did not destroy the screed when heated.Article on the topic: How to choose a self-adhesive seal for doors?
After filling the warm floor, it is left with a solution for 21-2 28 days. During this time, concrete will pick up its main performance indicators. When a concrete solution becomes solid, the control of the heating system is carried out. Moreover, the temperature is raised gradually for some time until achieving performance. If the heating system, which is equipped with a work floor, has a dross, it is turned on 10 days after the fill. The warm floor program increases the temperature every day for a pair of degrees, it can also be adjusted in manual mode.
First, it is necessary to consider the fill of the water heating floor, since the electrical system is laid in almost the same scheme, but with some differences. For example, the reinforcing grid is laid under heating electrodes. Under the cables that supply the voltage to the heater are put on foil roll sheets.
When installing a warm floor, you need to select pipes, because it is one of the most important elements in the floor laying. The work of the entire heating system depends on the quality of the pipes. The perfect material for pipes is copper, as it has a high thermal conductivity, and the material itself does not rust and does not age. However, copper is a metal dear, and the pipes in order to make a warm floor, it will take a lot. More to install copper pipes will require special welding.
In this regard, it is best to use pipes from metalplastic. Metal plastic is cheap and easy when installing, as well as unpretentious in operation. It is plastic, that is, it can be bent, has high temperature characteristics and does not age with time. For metal plastic, welding will not need, as it is easy to install it manually.
When laying a floor insulation layer, it is important to arrange pipes so as to ensure uniform heating of the entire surface area, that is, it is necessary to create the same thermal conductivity in all places. When installing pipes, it is important that the step is observed, and the diameter of the pipe itself approached it. Calculations show that in step 300 mm, the diameter of the tube must be 20 mm. This is another advantage of metal-plastic pipes: they are withstanding the standard step.
Article on the topic: How to clean the filter in a washing machine?
Options for pipes
There are three types of installation of pipes for a warm floor: spiral, serpentine or hitting, with a dual spiral. When the pipes are installed, the heat is distributed uniformly, since the pipeline is directed toward the center of the room. Therefore, heat from the source flows to the center, and from the center it is sent to the collector. Spiral styling does not have sharp bends, but there are few straight segments. Although the attachments are often used in this installation. When laying a snake, the heat will be suitable on the one hand, and to go out on the other. As water removes it cool, and this will lead to the fact that the long-distance part of the pipe will heat up more than the closest. Therefore, the total length of pipes used in such a system should not exceed 70 m.