
Laminate is a modern material that is widely used in the decoration finish. At the same time, the characteristics of this building material make it possible to use it for laying on the floor, the ceiling in any room is independent of moisture. Laying the laminate is simple, but it is necessary to accurately follow the technology in order to get a perfectly smooth floor covering, ceiling or walls.

Laminate device diagram.
However, the main requirement in order to lay the laminate panels is to obtain a smooth source surface. This problem can be solved in several ways. But optimal is the laying of laminate with their own hands on Faneru.
Proper laying of plywood
In order to perform the condition for the proper installation of the laminate on the floor, it is necessary to lay plywood sheets. They will be able to align minor flaws of roughing, as well as form a smooth surface for further work.
Plywood is a versatile building material that is ideal for aligning the surface, is not relieved in processing and durable. At the same time, the installation itself is quite simple.
In order to put plywood sheets, you will need to purchase the following tools and materials:
- plywood sheets with a thickness of 10-30 mm;
- electric or rechargeable screwdriver;
- self-tapping screw;
- glue mix for wooden products;
- Machine for grinding or sandpaper, which is secured on a special handle, convenient for long-term operation.

Scheme laying plywood substrate.
Additional tools that can be useful are a jigsaw and a long construction level. They can be used if laying of plywood on lags is required.
Being a sufficiently dense material, plywood will give additional stiffness to the sexual coating, thereby increasing its reliability and duration of the service. To plywood possessed the same characteristics as the room in which laying will be made, it is necessary to give it to be cured for several days in the room. This will increase its service life.
Installation of plywood can be performed directly to the existing floor or with a lag. Moreover, the method of its laying depends on the draft flooring. For example, if the floors are originally made of wood, then the Faneur can be drained to it. Lagges are used if the draft floor is made with a screed, and attach directly to it sheets of plywood is not possible.
Article on the topic: Blue living room - 110 photos of the unusual combination of blue shades in the living room
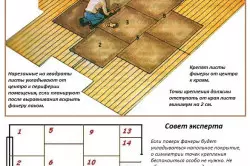
When laying on the wooden floor, Phanera is placed in a checker. Such installation will allow you to lay a laminate for rigid, durable base. Moreover, 1 page of plywood sheets is stacked so as to cover the entire space of the room. 2 row are mounted with a shift of 200-300 mm relative to the first. Phaneru is fixed using selflessness using a screwdriver. At the same time, the hats should be recessed into the sheet, so as not to cause damage to the next row of plywood or laminate board. Fixed in all corners of the sheet.
Practical recommendations on laying

Installation chart of beacons.
If the plywood is fixed in mandatory lags, then work starts with the installation of beacons. They may be self-tapping screws, which are twisted in the floor after 40-50 cm in 1-1.5 m, depending on the size of plywood sheets. When performing this work, it is advisable to use a long construction level. With it, you need to ensure that strict horizontal is respected.
Next is taken 1 of the sheets of plywood and is cut to the desired number of strips of 3-5 cm wide. This is lagows. You can fix them using special glue. The gaps that are formed as a result of the installation of the lag fills the plywood of the required thickness. Pieces are fixed using glue designed to work with wood.
Further, the work can be carried out only after the adhesive mixture will finally dry. Phaneur is cut into squares on the squares, the size of which corresponds to the distance between the lags. Lugi is cleaned with a brush from dust and start the installation of plywood sheets. The junctions between plywood should be located in the middle of the lag. The fastener is produced by self-assembly using a screwdriver. If the rooms are located in the room, it is necessary to perform the appropriate slots in the plywood before final stacking. In the process of laying plywood, it is necessary to control the horizon all the time using the construction level. This will avoid the subsequent distortions of the finishing flooring from the laminate.
Article on the topic: Crimper for crimping tips
The sequence of laying plywood sheets.
Regardless of what method was made by the plywood sheets, after the entire room was covered, it is necessary to polish the entire surface. For this purpose, the grinding machine or sandpaper is used, which is fixed on the holder for the convenience of work. Special attention to grinding is given to the joints. The whole procedure is necessary in order to provide a perfectly smooth surface, as the further installation of the laminate requires the laying of a special substrate, which must be used as a whole, without deformations and damage caused by surface irregularities. In addition, grinding will allow remove flaws of plywood sheets that were formed in the process of their production.
Laying of laminate: features
Before starting work on the installation of a laminate, you need to prepare tools and materials. Read:
- Laminate and substrate for it.
- The square, which is used to mark the laminate board when performing the cut.
- Roulette and pencil.
- Electric or rechargeable jigsaw and petties with small teeth. In the absence of this tool, you can use a saw for metal. It will allow the laminate to cut, without damaging the edge.
- The bar, with which the laminate boards will be bought in the process of laying. It can be special and made of solid plastics, which is not damaged when exposed to a hammer on it.
- Wedges that will be used when laying the first row of laminate between it and the wall.
- Perforator or drill with which you can install the plinth.
- Dowels for attaching plinths.
- Hammer with a wooden slaughter.
- Self-tapping screw and screwdriver, which can be further consolidated by laminate. They are used when fastening it on the ceiling or wall, which provides additional join reliability.

Tools for laying laminate.
Laying laminate with their own hands requires compliance with technology, patience and accurate execution. The board should fly in the room where it is planned to be installed, at least 2 days, which will allow the laminate to acquire the same characteristics of humidity as the room. This is necessary so that after the installation of the laminate is not deformed as a result of changes in the temperature indicators of the room.
Article on the topic: How and how to align the wooden floor under linoleum
There are 2 main styling methods:
- In parallel or perpendicular to the window to the window;
- Diagonal premises.
When choosing 1 method, for example, perpendicular to the window, the seams between the laminate boards will be practically invisible, the consumption of the material will be minimal and correspond only to the area of the room. If you lay diagonally, the laminate will spend a little more, but the design of the room itself will noticeably won. It should be noted that the diagonal installation requires large skills, scrupulsiness and correctness in the calculations.
Laminate Laying: Completion of Works
Along all the walls it is necessary to establish special wedges.
They can be made of wood, plastic. In addition, you can use pieces of laminate that will fit further. The substrate is stacked, which is fixed with the help of a construction bar for brackets. Before installing 1 row of a laminate coating, it is necessary to cut the extreme panel with a labzik or a saw blade. It is necessary to place the laminate itself so that the castle is located closer to the person. This will facilitate the snapshot of the lock connection.

Laminate laying options.
If the laminate is installed on the floor, it is impossible to fasten it to the plywood to the plywood. This is due to the fact that the board should be able to expand and squeeze when the ambient conditions of humidity and temperature change due to the presence of the gaps between 1 near and the wall.
For the guaranteed reliability of the joints, the laminate should be located with a shift. Therefore, after 1 row is laid, the next row of the next row is cut into the required distance between the side joints. The panels are snapped into the lock and with the help of a bar and a hammer beam, which ensures a reliable connection. All other rows are laid similarly. The slots for communications are performed before putting the panel to the place, pre-placing it with the help of a roulette and jigsaw. To ensure a smooth slice, you can use the coal when markup.
When the entire area is covered with laminate, drill holes in the walls under plinths. Install them in place, pre-delete all temperature wedges.
Thus, we can assume that laying of the laminate is made. Good luck!