
Make Japanese lamps are not as difficult as it may seem at first glance. An ordinary chain grid, if desired, can be turned into an exquisite Japanese-style chandelier, and the table lamp of bamboo rice and rice paper will create an unforgettable atmosphere of the rising sun in your interior.
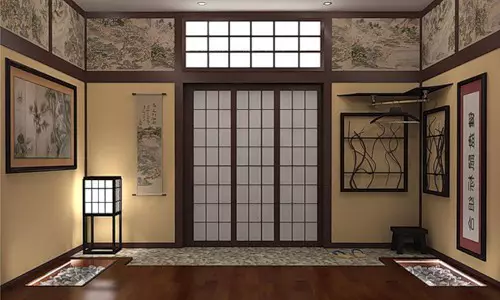
Japanese lamps can be swallowed to the ceiling or placing in the corners.
Japanese lamp from Rabita Mesh
It will take:
- Rabita grid with small cells;
- Scissors for metal;
- pliers;
- thin wire;
- cartridge;
- White paint in aerosol;
- 2 metal circles.
It is easy to make such a lamp with your own hands, as the lamp design is very simple. The lamp consists of a square bottom with concave in the middle of the edges and frame. First of all, it is necessary to bend metal circles in such a way that the same squares are turned out to be concaved to the center. To do this, draw the pattern on thick paper, first the square, then take a saucer or plate with a smooth edge and make arcs on each side. By this lecture, bend metal circles. If you failed to get similar circles, you can make parts from thick wire, in this case the edges are fastened with a thin wire so that the connection is not too noticeable.
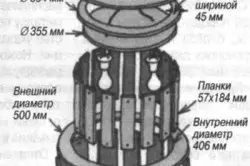
Scheme of the Japanese lamp from plywood.
In order to make a bottom, it is necessary to cut the mesh on the lecture, without forgetting to leave the allowances on the seams. Next, with the help of pliers, you need to pull the chain chain mesh per square frame, bending the edges on the wrong side. It is very important that the grid tightly wrapped the metal rods and created the desired tension, the material sagging in this case is unacceptable. Cartridge is attached to the center of the bottom of a thin wire.
For the manufacture of the lamp, it is necessary to carve out a rectangle from the grid, the height of which will be 30-35 cm (depending on the desired height of the finished lamp). To determine the width of the lamp, all sides of the square are measured, add 1-2 cm on the side seam. Next, they take the second square, it is tightened by its grid in such a way that a certain semblance of a cylinder is obtained, the lateral seam is seamged thin wire. After that, the chandelier is connected to the bottom.
Article on the topic: Separate bathroom or combined: what is better
Luminaire paint white aerosol paint. It is important to apply paint with thin layers with a mandatory intermediate drying, otherwise the drops will score the grid cells. After everything is dry, proceed to the manufacture of hieroglyphs. Rabita is cut into thin stripes in 2 cm, then bend in half. You should have a kind of lace. The hieroglyphs are formed from such strips, glued them on the product with a glue gun. Wonderful chandelier in Japanese style is ready!
Bamboo Table Lamp
It will take:
- bamboo bars;
- rice paper;
- Cartridge with a cord;
- hacksaw;
- stencil with Sakura branch;
- acrylic paint;
- Pen's rope;
- Adhesive pistol.
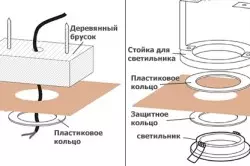
Desktop assembly scheme.
It is possible to make a lamp with your own hands in Japanese style from bamboo and rice paper (sold in stationery and woodcraft departments). The table lamp will consist of a rectangular frame, a cartridge with a cord and the walls of the finest rice paper. First of all, it is necessary to cut a bamboo on segments: 8 pieces of 20 cm (for the lower and upper frame frames), 4 pieces of 30 cm (vertical risers). Dimensions can be changed at its discretion, everything will depend on what height and width you want to make a lamp.
Next, begin to make a framework framework, you need to make 2 parts, each should consist of 4 bamboo planks.
It is necessary to make a square on the principle of building a cut, that is, each plank is connected from the neighboring cross-closer at an angle of 90º.
It is very important to withstand the angle, otherwise the lamp can shift.
To connect the elements, the adhesive gun is used first, then each angle is additionally fixed by the hemp rope (cross-crosswise), which also performs a decorative function. The ends of the rope are neatly lined.
After the top and base are ready, it is necessary to install vertical risers, they are glued in each corner (from the inside of the lamp) so that the ends do not protrude beyond the frame. Next, take rice paper, cut it into squares equal to the length and width of the resulting windows. With the help of a sakura branch, if you failed to get a stencil with the desired pattern, then try to draw from the hand of hieroglyphs.
Article on the topic: Original ideas for flower beds
After drying the paint, pose each rice paper sheet in the lamp windows (from the inside). Cut from the sheet of plywood square, the dimensions of which will correspond to the inside of the lamp. Screw the cartridge, make a hollow under the wire, ends with glue, put on top of the lamp, leave until a complete burden. Desktop lamp in Japanese style ready!