
Most of the homeowners and summer residents have a shortage of free square on the plot. I want a garden, and fruit trees, and a place to relaxation. Allocate the territory for the gazebo is completely simple, a small quiet corner is suitable under the shady tree aside from the fuss.
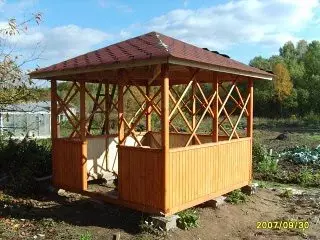
In such a place simple gazebo 3x3 with their own hands built, decorate your leisure. Here you can retake in a circle of friends or loved ones, discuss news for a cup of tea and enjoy nature. Compact sizes and do not block the site, and will allow you to accommodate six-seven users with comfort.
Such a structure is easy to do on your own.
Where to begin
First you need to choose the type of structure, and then design it.Types of Armor
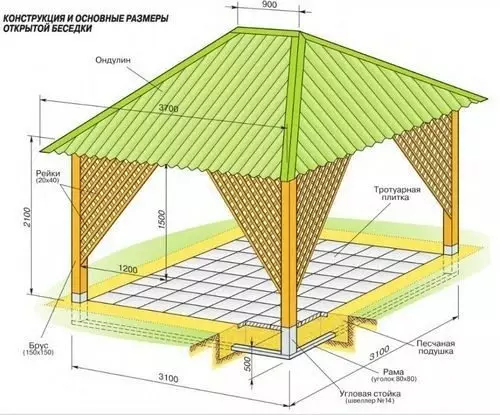
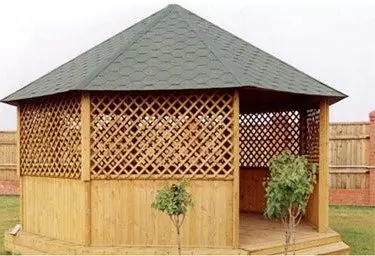
In the photo the design of an open structure.
- Closed building . It is almost a miniature house, with windows or glazing, on a steady foundation and with a reliable roof. It can be collected in both in summer and in winter, the poor weather is not terrible. If you have built a gazebo 3x4 with your own hands, it can even equip the space for unexpectedly gorgeous guests or relatives.
- Semi-open structure . This is an already facilitated option, with windows or protection to a certain height. From wind and precipitation can be closed with a film or polycarbonate. The roof is performed from non-heavy materials - reel, plastic, metal products or moisture-resistant plywood.
Note! Some ready-made models even disassemble. But the strong wind is not able to withstand such a building, so it is more profitable to purchase stationary, and not mobile.
- Open Arbor . This is a summer option, for relaxing outdoors. It can be closed around the perimeter of the exquisite wrinkling, crate from the rails, or another original finish. The design is independently very easy, and the price of materials will be minimal. The collapsible analog can be dismantled with the onset of autumn and transfer to another place if necessary.
Article on the topic: Wallpaper cream color
It is worth noting separately that the gazebo can be as standing separately, in the distance from the house and attached to it. The second option is convenient because you can get into the structure directly from the house, and the conceded gazebo 3 on 4 do it yourself will look like a veranda. This will additionally protect the main structure from the cold and wind, and be inside will be comfortable almost all year round.
We plan to build and prepare
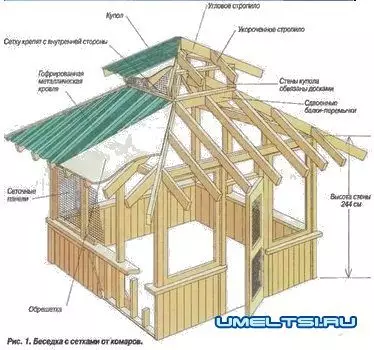
The scheme of the structure.
- First of all, decide on the location, type, as well as with the size of the future design. As a rule, gazebos 3 on 3 with their own hands are set at some distance from the main structure, and the homemade path from stone, gravel or tiles leads to them.
- Follow the territory, align the perimeter by checking the plane by a water level. Do or not to do a foundation - depends on your desire and from the planned power of the construction.
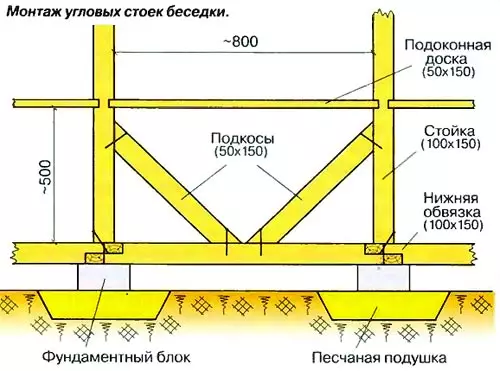
- For a light open or semi-open arbor, there are enough inserted pillars from bricks in four corners, which is then fastened. Instead of bricks, you can use wood, asbestos cement, steel pipes. They are laughed in a deeper level of soil freezing, height is also controlled by the level.
- The basis for the floor can serve as a pace with a cross section of 10x10 cm, it is attached to the columns, then laid down. The instruction provides for compulsory waterproofing from rubberoid or other, special materials. All wooden components must be impregnated with anti-grapple composition.
- You can put a sex or special terrace board on laid lags.
Articles on the topic:
- Arbor 3 on 3 (photos)
- Arbor 3 4 meters
- Gazebo 2 2 meters
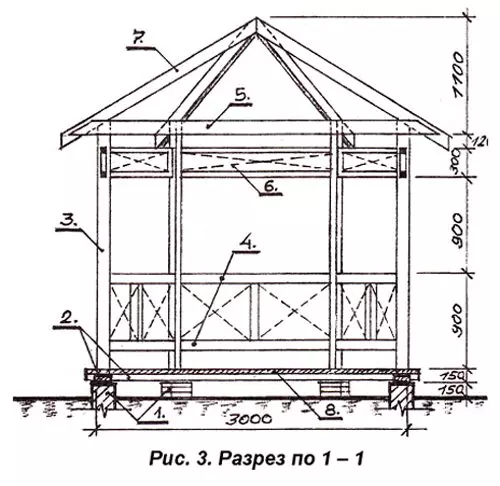
Stages of construction
Installing supports.
- At the next stage, racks are erected - the basis. For a square gazebo, it is advisable to make nine supports - four in the corners, one at the middle of three sides and two on the sides of the entrance. It is convenient to apply a square sections or folded with each other.
- If a gazebo 2x3 is built with their own hands, it is enough to six pillars. For the main racks, take the timing to the railing and the supplements will suit the material with a cross section from 10x10 cm.
Article on the topic: Painting of stairs from pine with their own hands
Four-page roof circuit.
Note! The roof is better to make two-tie, both for square and for a rectangular arbor. Single table is not aesthetic, and the care of it is quite troublesome. Four sheet looks spectacular, but complex in installation.
- For the roof, two supports are installed in the center, the base for the skating timber is fixed. Next, 4 rafter boards are placed on an equal distance. They nourish a crate consisting of a 25 mm thick board. The distance between the shelling boards is made at least 20 cm.
- For the finish coating of the roof, use Ondulin well. It exits noise from falling raindrops, and also durable and strong enough. You can also use tin or professional flooring, but during sediments inside it will be too noisily and uncomfortable.
- The railing should be made from the bar of the same sections as the main racks. The height of the fence should be so as not to close the review. It is optimally up to the meter, with the height of the very gazebo of at least two meters.
At the top of the wall can be decorated with a crate of the plates.
Articles on the topic:
- Arbor 4 on 4 do it yourself
- Even before making a wooden gazebo with your hands 3x4 or more compact, be sure to think about the decor and bow to the material. The strapping is very original, made from crossed the same plays. Finishing and create a decorative effect, and will ensure clear boundaries of space.
- The simpler design is the upholstery by clapboard vertically, from the floor to the border of the railing. You can make a solid fence where the boards cost close to each other, and you can navigate them at the same distance.
- Very beautiful looks inserts from reinforcing curls. The rods are bent, then the elements are welded in the desired combination to each other. Ready drawing insert into the space of the strapping.
Article on the topic: Multifunctional corner sofa with sleeping place in the kitchen
Output
Alone, or with an assistant, hoping a minimum of tools and materials, you will bring a wonderful gazebo on the weekend. Then all the problems about where to gather a small company will disappear. Holidays on the lap of nature in a gazebo with a kebab will now be regular, and your dreams about a cozy corner will finally be pronounced.
To gain inspiration, take a look at the video in this article, then you will definitely not postpone the planned, pleasant work.