
The loopback of the loop mill is easier than if the chisel had to work. There are several types of milling mills that make manual work with hinges hanging.
Classification and use of manual milling
Cutting loops milling
Before installing new interior doors, you must prepare the doorway and the door frame for the installation of loops. Previously, it was necessary to paint and the chisel to be written: the process is tedious, takes a lot of time and physical strength. But now there is a manual milling trans - a drive electric tool, with which you can prepare the grooves of a complex configuration in wooden products. From now on, on questions, how to remove the door with the loops, how to cut down new loops, both beautifully and firmly combine complex-profiled strips, and you can get qualified and clear answers to many others.
This will help videos, as well as detailed step-by-step instructions on working with a milling mill, speech about which and go further. Performing such operations with your own hands, you can significantly save time and save family financial resources.
Since such devices are intended for making a variety of profiles, the final result will depend on the type of working tool - cutters. The cutter is purchased either complete if the mill will subsequently have to perform other, similar works, or specifically under the required groove profile.
The milling mills are divided into:
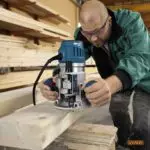
- Vertical - relatively impressive in size of the machine, the milling head in which moves in the vertical direction using special guides.
- Edge - designed for cutting and designing edges of wooden products. These cars are compact and have a small mass.
- Combined - with their help operations are performed both by vertical and horizontal milling. Such power tools are especially useful when installing input doors.
- Special - for example, for power installation of dowels in concrete surfaces, for vibration processing of edges (trimmers).
Article on the topic: Size, step distance, installation schemes Lag for floor
The sizes of some types of hand mills are reduced to the table:
| Model | Purposera destination | Milling head move, mm | power, kWt | Rolls, 1 / min | Mass, kg. |
| Hitachim8SA2. | Vertical | 60. | 0.9 | 25000. | 3.5 |
| D26204K. | Vertical | 270. | 0.9 | 16000-27000 | 2.9 |
| Bosch Pof 1400. | Combined | 55. | 1,4. | 11000-28000 | 3.5 |
| Bosch GKF 600. | Edge | — | 0,6 | 33000. | 1.5 |
| Makita 3710. | Combined | 70. | 0.53. | 35000. | 1,6 |
Mill
When choosing a milling model, it is worth paying attention not only to its technical characteristics and capabilities, but also on completeness, as well as ergonomic indicators. The car should be convenient to keep in hand, otherwise you can harm your own health. Usually, a universal milling mill is acquired for multiple work, and if the work will be one-time, you can take the device for rent
When installing input or interroom doors (similarly for both the cabinet doors), the following works are performed by the mill:
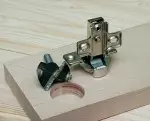
- To prepare deepends - in case of pads on the hinges;
- for cutting locks;
- To prepare compounds of individual elements, for example, door trims.
Before the direct use of the car should be practiced on unnecessary joinery elements. However, the process of the milling of the milling is fairly simple, and it is quite possible to master it yourself, using training video.
Preparation for cutting canopies
Inserting canopy milling
This procedure is the most common, and is used both when replacing the old door and when installing a new one. In addition to the cutter, another ordinary carpentry line will be required, which is visible on the video.
At the first stage, you must perform the markup of the box under the existing loop of the interior door so that the adjustment passed quickly and correctly. Adjusting the position of the loop should be made with the least probable distortion when opening / closing the door. Markup can also be performed using a special template that can be made independently. The template is sometimes adjustable and unnecessary fragment of the door molding, the dimensions of which coincide with the dimensions of the door frame.
Previously one of the edges should be tied. The placed the kitchen is installed on the outer side of the door and in the necessary places glipulate the scotch bands - they will serve as a kind of milling limiters.
Article on the topic: Karcas for hammock: types and order of construction
Working with the machine
The block pattern is attached to the selected location on the door canvase. The width of the template bar and the loops must coincide, otherwise the sealing gum can exit the dimensions of the door, and it will not be highly covered. The end of the template is combined with a pre-performed markup and slightly trimmed with a sharp knife.
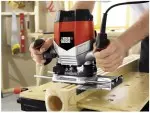
Now the turn turn is: we attach a ruler to it, which is usually included in the aggregate kit, and the mold thickness compensator. It can be done independently, as in video, and you can simply take into account this thickness in the process of milling the groove. It is especially carefully adjusted by the position of the regular line of the milling roller. The length of the milling section is exhibited along the loop length, and the width of the milling groove is 1-2 mm less loop width.
Such a margin is needed in the case when you have to re-remove and hang the door - the procedure is quite likely if you need to adjust the relative location of the product in the door frame.
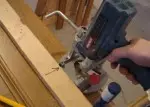
Milling is usually beginning from the edge to avoid possible surface chips, and then milling directly under the loop. The insertion into the material must be carried out at maximum cutter values (for models with an adjustable speed of revolutions) and with a small supply cutter - so the probability of damage to the surface of the canvas during the insertion will be minimal. The prepared loop is applied to the elevated groove and, if necessary, produce manual finishing using the chisel or file. Fully the routing process of the loop mill is shown on the video.
Safety at work
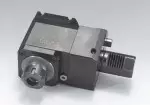
Milling head
The manual machine in the insertion process has a greater speed of rotation of the milling head and therefore vibrates noticeably. Before starting work, you should carefully check the reliability of the fastening of the collet with the cutter, adjust it. Vibrations can damage and door leaf. It should be noted that natural wood defects can go to the surface of the door frame - in particular, the knots. Therefore, milling in these places is undesirable.
Article on the topic: how to make glue with your own hands
If it is impossible to do without it, it is either reduced by the number of collet revolutions, or reduce the force of supplying the milling head. Be sure to check the machine and, if necessary, lubricate moving and contacting parts, adjust them. The same applies to storage - you need to lubricate and adjust the milling time before putting it on storage.
The railway railway rails may have some curvature, so before hanging the door, it is worth checking the uniform of the gaps to open / closing the door and, if necessary, adjust them (for this, the grooves performed). With the equality and sufficiency of the gaps, the same works, as well as previously performed on the doors, produce with the door frame.
To complete the installation process, it remains only to lift the finished door in the loop, lubricate the loops connections and hang the finished product in the door frame. Educational video about the installation process of the input interior door will help to figure out how to do it.
Similarly, you can trim and hinges of the swinging doors of the cabinet in case of updating or replacement. Some differences consist only in the sampling technology in the body of the cabinet body. For example, for high-quality processing of the groove with a mill, you must first lift in the hinges, and then remove the old door. Then you should pre-prepare the template for new loops and make the marking of the excavation in the cabinet housing.
Next, do all the operation described relative to the entrance door, be sure to lubricate the loop and adjust them.
Sometimes instead of the insertion on loops, mark the cabinet case. In this case, it is even more convenient because the cabinet door is noticeably easier than the entrance or interroom door.
The inserting of door loops with a milling mill is a high-performance operation that can be performed independently.


(Your voice will be the first)

Loading…