
A not one crafter was thinking about how to sew a jacket with his own hands, but each stops before difficulty performing the pattern correctly. In fact, in the worldwide Internet, find the patterns of female jackets for free is simple, however, they are most designed for typical figures. Therefore, we want to offer you a master class, which will tell in detail how to build the pattern of the female jacket, focusing on your figure.
In fact, the jacket must be mandatory attributes in any wardrobe. Thanks to this thing you can combine completely different and unusual images, turning from a business woman into a secular lioness.

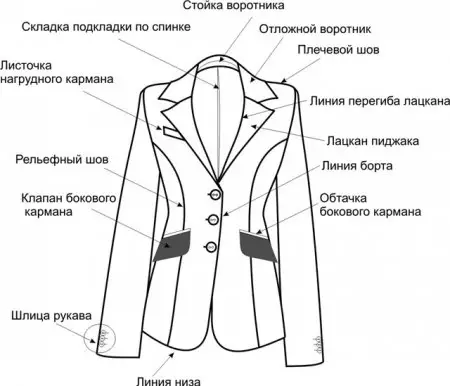
However, so that the jacket is good for you, it is necessary to properly take into account our own proportions and features of the figure. It should be noted that if you have a high waist, you can safely wear a short skirt in combination with a long jacket. For the owners of a small breast, you should choose models of jackets that have lapels and pockets, and also have a closer cut.
So, for the pattern of the jacket should have certain measurements: the line of blades (LL), the breast line (LH), the waist length on the back (DTS), the width of the back (SC), the slope of the shoulder from the back side (NPS), chest height (Sun) , width of the armor (SPR), the length of the waist on the front of the front of the jacket (accident), the slope of the shoulder from the front of the product (NPP), the length of the sides (dB), the width of the same breast (SHG1), the width of the second breast (shge2), level Molding solution (URV), the distance between the nipples (RC), the semi-rareness of the neck (SS), the semicircle of the first breast (CG1), the semicircle of the second breast (CG2), the waist part-rapidity (ST), the harness of the hips (Sat) and finally the length of the shoulder ( DPL).
The main size for the pattern of this product is the line passing along the chest. Do not forget to take into account that on the pattern it is necessary to provide freedom of fite, which depends on the selected jacket model.
In this case, it was decided to use the freedom of planting on the chest line - 6.5 cm, on the waist line - 7 cm and on the thigh line - 3.5 cm.
It should also determine the freedom of plantation for the breast line, which will be equal to 6.5 cm.
Another centimeter should be added to the lengths of the length, as the jacket will have a lining part and sweepers.
Article on the topic: Origami butterfly: A simple scheme of bills and modules with photos and video
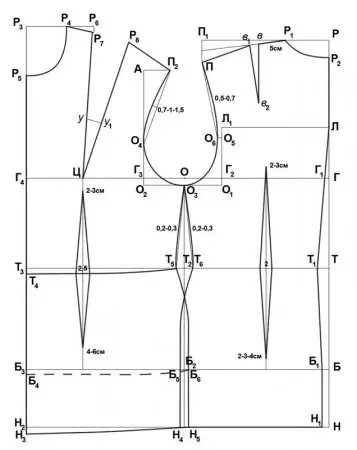
Building to start the backrest.
In the upper right corner, we postpone the point P and build a straight angle from it, so: Line РЛ = ЛЛ + СО - the line of the blades, RG = LH + CO - the breast line, RT = DTS + CO - the waist length.
To draw the segment of TB, you should fold the measurements of DTS and CO, and then split them in half.
What will be the length of the jacket depends on the selected style and your shape. If we consider the classic forms of the jacket, then its length usually reaches the hips or ten centimeters below them (BN = 10 cm).
From the thus obtained points on the vertical line, the horizontal lines should be postponed on the left side. Then the line should be built on which side seam will go. The latter depends mainly on the type of your figure. If you consider classic forms, this figure requires a recess on average seam on the waist line about two centimeters, that is, TT2 = 2 cm. Similar to BB1 = NN1 = 1.5 cm.
The PR1 segment is equal to the third part of SS + CO, and Rr2 = 3 cm. Note that P2 is drawn at an angle of 90 degrees.
At this stage, connect the line of points P2, L, T1, B1 and H1.
For the segment LL1 it follows SC + CO, and the vertical from the point L1 will give down the point G2.
Cut G2G3 is a width of the armor, which is calculated by the formula of the SPR + CO.
The point o is obtained after dividing the resulting segment in half.
From this point, down to omit the perpendicular line to the intersection of the lower horizontals and get the point T2 and B2.
To get the workpiece of the product follows dB-3 cm.
The resulting value should be noted by vertical up from the point T2, thereby getting a segment of Oz.
We build a shoulder segment for a jacket.
From P1 you need to move the tag on an arc equal to the PDL + 0.5 cm + 2 cm + 1cm.
Also from T1 we interpret the tag on an arc equal to the NPS + CO.
The point P is obtained from the intersection of these arcs. From it, you should spend a vertical line that crosss the horizontal at P1 point. Sharing PP1 in half and connecting the resulting point with P1.
At the resulting line, one third of the DPL should be postponed, receiving a point that is designated as "in" in the drawing., From it, one and a half centimeters should be postponed. "BB1" = 1.5 cm, "B1V2" = 10 cm. It remains only to connect such points as B1 and n each of the segment.
Article on the topic: Weaving Caskets from willow for beginners: how to weave with a master class and video tutorials
Build a shelf for a female jacket.
We continue to build the shelf of our product, its width along the chest line should be calculated by the formula G3G4 = SHG1 + CO. From the resulting point G4, a vertical line should be conducted.
G4r3 = VG + CO - we get the height of the chest. Р3Т4 = accident + co - length to the waist.
For the allowance for the jacket bulge, you should take about one one and a half centimeters.
P3R4 = one third part of the SS + 2 cm - the size of the width of the neck.
P3R5 = one third part of SS + 3 cm - the size of the depth of the neck.
Now we connect the points obtained and divide the segment in half. From the center of this line, lay a vertically a couple of centimeters. Smooth line we combine all the points of the neck.
Fixed size P4R6 = five cm, as well as p6p7 = one cm.
The length of the shoulder to the pump - p4r7 = 5 cm.
If we talk about the distance to the stop of the shading on the chest, then it is calculated by the RC + 0.5CO.
How the breastpid is built.
To build it, you should connect two points P7 and C. To calculate the level of the incoming solution, which is located on the chest, it is necessary for the sizes + co, we get the size of the CSU.
Then necessary by a radius equal to 10.5 cm from the point C, to read the arc passing through W.
Caseing the difference between such values as SG1 and SG2 and reducing the result per centimeter, we obtain the breast income solution. Now, from the point, you should postpone three centimeters on the arc, the result is a point U1.
Connect the C and U1 straight line, which should be extended to the top. As a result, equalize the distance of the CR7 and CR8.
After crossing the arc, it turns out that P2, which is the shoulder. I arc draws radius = dpl + 1 cm, and II - NNP + CO.
Places of checkpoints of the premium.
We find A at the intersection of the horizontal and vertical line. The horizontal line comes out of the point P2 to the left side, and the vertical goes from the point g3 up.
The resulting segment of G3A should be divided into three parts, the lowest of which will be the desired point. It should be denoted by the O4 - the control point of the transmission.
Article on the topic: Candy and other sweets: Master class with photos and videos
Cut G3O4 plus a pair of centimeters is a checkpoint of a backrest.
In order for the armor to look beautiful, it is not easy to lengthen the shoulder line, but to change it a little. To do this, expand the pattern of the back in the place where the control point is located. The extension value is about one centimeter. That is, O5O6 is one centimeter.
Connect points P2, O4, O, O6 and p smooth line We form directly the progress of the product.
The depth of the shackle, which is located on the waist line.
To do this, it should be a difference between such values as SG1 and Art, while not forgetting to take into account the freedom of the fret.
We use the formula (SG1 + CO) - (ST + CO).
Equality should also be taken into account equality of such values as T2T5 and T2T6, which are equal to one and a half centimeters.
Now the following values should be taken from the result:
Two centimeters - the size of the excavation in the middle seam on the parts of the back and one and a half centimeters is the size of the removal on the side section of the product, as well as one and a half centimeter is a notch, which is located on the side cut of the shelter.
Now we will proceed to calculate the width of the patterns of our product in the hips area, you should take advantage of the following formulas:
(Sat + CO) - (SG1 + CO) - We get the size to which the sketch size needs to be expanded and the shelter.
Dividing the resulting value in half, we get the expansion of the seams on the sides on each site. In this case, we are talking about seam located with a side on the back and side seam on the shelf. Thus, the segments of B2B6 and B2B5 will be the same in their values and each will be equal to half acetimeter.
From those points that we have just received (B5 and B6) should be burned to the vertical lines to that part of the pattern, which is below.
Next, form the side of the side seams on the pattern of the product. To do this, connect the points O3, T5, B6 and H5, getting a side seam line for the shelf. And now we connect O3, T6, B5 and H4, we get a side seam line for the back.
As a result, we turned out the basis of the dressing of the jacket, which can already be changed depending on the model and the style of a certain jacket.