
Many love to spend their leisure on the river or on the lake. Such a rest will be much more interesting, more attractive if you think about the flooded and build in advance. For example, the boat is your own hands.
The proposed boat is very simple and any craftsman can do it. It is designed for 2-3 people, without much difficulty can be transferred to the house for storage.
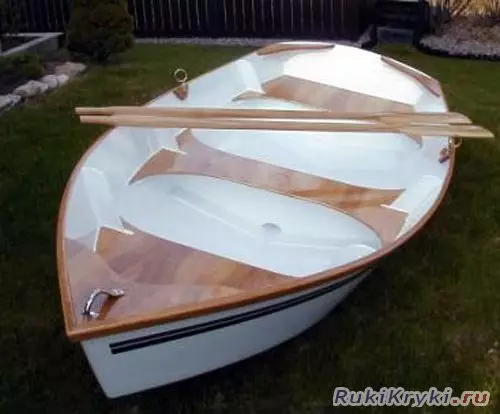
Own weight of the described boat is approaching the weight of kayaks and canoes, but unlike the latter it can be standing in it, to change in some places. You can walk under the sail and motor, catch fish and hunt. The boat has the form of ordinary folk Volga boats, and although rusty is rude but rather high-speed and safe.
Design of boats and materials for its construction
The boat, which we called "Volzhanka", has a length of 4.5 m, a width of about 1.05 and a depth of 0.4 m. It consists of a wooden frame (dial) and plywood.
Plywood glued with smallery flies of thin strips of wood (veneer) is widely used in shipbuilding due to large mechanical strength, high homogeneity and comparative cheapness.
The base of the set is the keel, which is attached to the nose in the nose, forming the nose contour, and in the fodder - ahterstevin. Kiel coils make up the longitudinal connection of the housing The transverse strength of the case and the stability of its shape is provided by the splint edges with wooden ribs that play the role of the frame, the island. The lower part of the spangout is called Fluortimbers, two side parts (branches) are futoxins.
The upper tip of the stews and the swarthhum after the sheaving their plywood is bonded by a pair of sideboards, which provide sufficient longitudinal strength and rigidity of the vessel. In the future, we will call these boards.
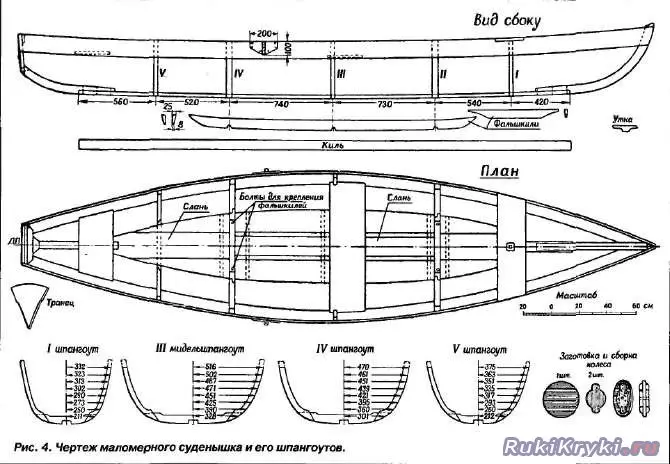
The plywood trim is bent out of whole sheets, and therefore the body has very few seams: two transverse connections in places of 2nd and 4th swinger, to which it is attached, and partly at Kiel. The shape of the boat is determined by the shape of the swinger, which are forced to strike the Faner. At the same time, sufficiently smooth circuits are obtained on sides and a quille and only on the spangling 2 and 4 (in the places of plywood) remains a small breaking of waterline.
Thanks to the arched arral form, the thin casing is very strong and withstands the water pressure on the boat housing. To protect the bottom of the case from shocks about the bottom of the river in small places on top of the plywood skin, a couple of false plans are attached.
Phaneur on the trim is best to take birch, without bitch, three-layer, 4-5 mm thick, impregnated with resin glue
To build a boat, the following materials should be prepared: 1) Fanoire of 1500 × 1500 mm - 3 sheets; 2) pine boards with a thickness of 15 mm standard length 6.5 m- 3 pcs; 3) 25 mm thick boards: 2 - 6.5 m long per keel and falsy, 1 - 2 m long per feed paddle; 4) a 40 mm thick board and 6.5 m long per spline - 1 pcs.; 5) boards with a thickness of 55 mm and a length of 2 m on a dungered and oars - 2 pcs.; 6) Naked fabric to coating the case - 9-10 m; 7) harated lime - 1 kg;
Workbathing details
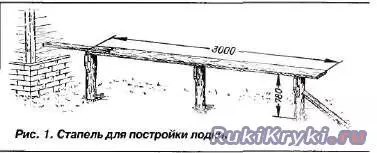
Building a boat is made on a simple stapel (Fig. 1). In order to make a stapel, it is necessary to wear three columns on the same level, to put the board on them, attaching it with nails. One column must be pushed, and for the second stop you can use the nearest wall.
First you need to prepare the splits. To do this, on a sheet of plywood, the splint quints are drawn (for these purposes, millimeter paper can be used).
For example, consider how the splint 2 is drawn.
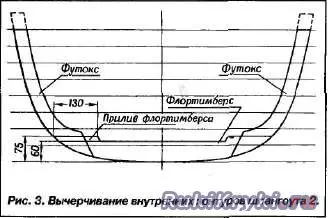
To do this, these are nine parallel lines every 50 mm and strictly perpendicular to them - one vertical. The latter is an axis of a spline floor located on a diametral plane (DP), i.e. The longitudinal vertical plane relative to which the ship is symmetrically. From DP laying out in both directions, segments according to fig. 2. When connecting these points with a smooth curve (it is best with a flexible rail) an external contour of the splint floor is obtained.

To draw the inner contour of the fluortsrs, the two parallel lines are 75 and 60 mm up from the main line (Fig. 3). We postpone from each side of the external circuit in the direction of PP 130 mm (for the splits 2. 3 "4 - 130 mm, for the splits 1 and 5 - 100 mm). This will be an inner point of the flortimberry tide, we carry out the inclined line down, to the upper section of the flortsrs.
To build the inner contour of the futoxon, we deposit a parallel line by 40 mm inside from an external circuit. In places of connection with FluortimBers, it is necessary to give broadening (see Fig. 3). The remaining splits are built similarly to the above. The contours of all the spangling, except II, are depicted in fig. four.
We take a leaf of the waist or other transparent paper of this value to cover the entire spline. We put it on the drawing of the spangout and copy it. After that, the paper bend on DP. If both parts of the spangling coincided, the work is performed correctly. If this is not, you need to check the drawing. Both half of the spline must be strictly symmetrical about the DP.
Article on the topic: Master class on the candlers from threads and toothpicks with their own hands
From the waist, each part of the drawn spline must be transferred to cardboard and cut out pattern patterns for flortimbers and futoxists.
When the contours of the templates are transferred to the board (the thickness of the board is 40 mm; the board must be oven on both sides), the templates should be placed along the fibers so that it is subsequently cutting the layers of wood.
Patterns for futoxists and footox themselves it is desirable to draw and cut off with a reserve in length, which in fig. 3 and 4 are inflicted from all futoxists with dotted lines. These stocks will be! Need when assembling the frame.
Relieved and outcast futoxons and flortim drives for assembly are put on the drawing (Fig. 5).
We note a pencil or a sharp selection of places of overlaps for connecting flortimbers and futoxists. Then weeping and select the locations of the connections, as shown in Fig. 5. Singing outlined places for sure until the middle should not, it is necessary to leave a stock of 0.5-1 mm, which then removes the chisel or rashpyl when fitting.
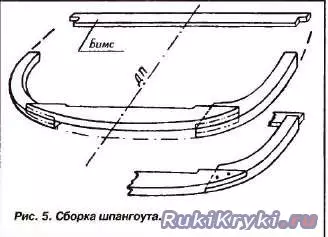
Heading tightly to each other all the details of the splint set tightly and making sure that the outer contour of the splint set exactly coincides with the drawing, it is necessary to bore them with nails. Nails should be hooked or split. For stiffness to the ends of futoxists, a temporary bar is nourished - BearS, to which transferred! DP line (see Fig. 5).
The remaining splints are made in the same way. Since 1, 3 and 5 plywood in the plywood, they can be made lightweight from the boards with a thickness of 25-30 mm.
The stentevere and ahterstevin are best made from a solid curved piece of wood, better from elm or oak. In the absence of them, they can be chosen by any breed of wood, but it is desirable that the layers of wood be curves and this curvature should roughly correspond to the bend of the stews.
If the curved tree does not exude, the belt can be made with a composite of two parts, as shown in Fig. 6.

The contours of the stews are drawn on the plywood, and then transferred to the material. First you need to cut the sleeper along the contour, then squeeze his edge of the heap I scrap 25 to the DP, and then stingfully.
For keel, they choose a straight, no core, a blackboard with a thickness of 25 mm, a length of 3.5 m. On the outstanding surface, two parallel lines are watched at a distance of 70 mm from each other. On these lines, the board is sharp in such a way that it has exactly a rectangular shape without distortion along the entire length.
Onboard boards must be cropped and staring so as to obtain the same width (150 mm) along their entire length (about 5 m). If there are 25 mm thick boards in stock, they must be treated to 15 mm thick.
The thickness of both boards should be the same so that they are rushed correctly and did not give distortion. In the central part, where it is necessary to attach streams, it is especially important to withstand the thickness.
A tramer board, forming a feed edge of the boat, prepare from the boards with a thickness of 25 mm. A trauma has a shape of an equilibried triangle, in which two sides are slightly concave, and the third, the top - convex. To the top edge of the transom for strength, the horizontal bar is fixed (see Fig. 4).
Assembling frame boat
The assembly of parts of the boat is beginning on the workbench, and finish on Earth. At the workbench put a keel, to one end of which ahterstevin with an attached to the transit is fixed in the castle, and another - the stem. Kiel with shames and swarthhums are connected by nails, small bolts, rivets or large screws (05-6 mm).
We must very carefully check if there is no distortion. They are eliminated by fitting. To check on the dp Cord and the transom, you need to score on the carnation and pull the twine between them. Just making sure that the centers of the keel and stock are one straight line, you can finally fasten them.
In all compounds, porous paper or fine fabric, impregnated with resin or thick paint. Make it, it makes it pierce through the upper part so that they are at 3 4 mm to deepen into the bottom, after which the upper part is removed, it is put on nails impregnated with resin or paint pad and the item put in place.
If nails are used for fastening, then they should be of such a length so that they can act beyond the parts connected. Best of all nails (rivets) beat outside and bend (or roll) from the inside of the boat. When slave it is necessary to wear a 08-10 mm puck on a sharp end of the nail. Holes for nails are best drilled by 1 mm drill less than the diameter of the nail.
After the stews put the splits. On the DP line on the spangles at a right angle, it is necessary to make a cutout under the keel. So that the splint is tight and more reliable at keel, the cutout should be cut about 0.5 mm already a spline. If the width of the keel is great and the splint can not be planted, the keel can be slightly directed. The landing should be checked on a stretched twin, which should coincide with DP Bims. If the third spline is made with a thickness of 25 mm, before covering for greater stops, it is necessary to put a plywood strip of a width of 100 mm and cut down the plywood thickness.
Putting the splits at the right angle to the keel, you can start their final fitting with nails with a length of 75 mm. After that, I need to give the boom boom. Take a round or rectangular strange bar, temporarily tie it to the ends of the keel from the inside, in the places of fastening it with steers, and in the middle between the timber and killers, the bar is 110 mm height (Fig. 7, a). To eliminate side distillations, bims, dunges and trauma should also be temporarily combined with each other by dp by any bar (for example, remaining after keel cut).
Article on the topic: Roses from corrugated paper. Master Class

The on-board boards are applied on both sides of the frame and the ends of them are tightly tied by the twine to the southwear. Then, cautiously ribbing onboard boards around the swarthhums, apply them to the transnt and bind. Excess ends should be trimmed. Posted in the place of the side are temporarily nailed. It turns out the hard back of the boat, which is trimmed then plywood. The framework prepared for the trim is depicted in fig. 7.6, and temporary bars are shown by dotted line.
Saving framework
When the frame is assembled, it is necessary to turn it up with a keel, to put so that it suggests the earth not by sides, but the elongated ends of the futoxists, and begin the most difficult and responsible time of the buildings of the boat - the trimming of the plywood.
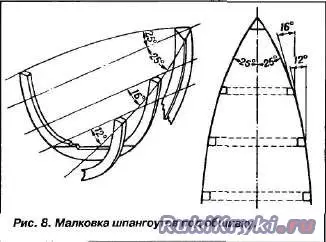
Before putting the trim, you need to "smalle" the splits, i.e. Remove the chamfer on their edges, which will ensure dense adjustment of the trim. In fig. 8 shows the exemplary corners of the mapping. However, it is better to navigate not in the corners, but put a thin rail on the pin and remove the chamfer, until the rail in all places will not fit well to the spline.
For the nasal and forage parts, the phaneer is cut in the form of a trapezoid. At the top of its bases, they make a rounded neckline to the center and rubbed to the near-thespore. They are necessary in order for plywood, starting to gradually bend from the horizontal position at Kiel, smoothly bent on Forstevna.
If the plywood will crack and fuck badly, it must be moistened from the inside. It is best to split it, for which they pour steep boiling water into the trough and tightly covered a lone with a sheet of plywood sprinkled for 10-15 minutes. If it is possible, it is possible to warm up the trough from the bottom so that the water is boiling.
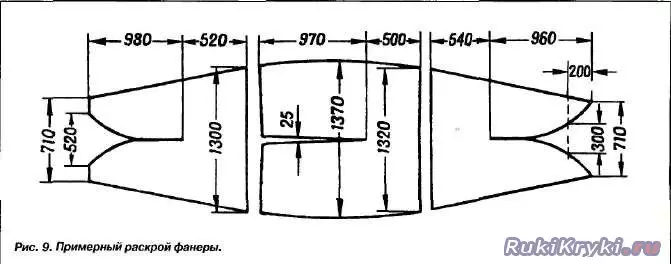
In fig. 9 shows only an exemplary plywood cutting, which can be suitable for the framework. The exact dimensions are determined on the spot, and they depend on the resistance of the plywood of the deflection and on how the board will argue.
The fibers of the outer layers of plywood are placed along the length of the side (and not across it), and the sheets are cut according to the reversion with a reserve of 30-40 mm. To do this, you need to put the center to the center for a keel, and a wide base for the spline 2. Posted by Phaneru so that it does not move, you need to start gently bending it from keel to sides. When Plywood touches the sides, it is necessary to bind it with a rope or wire along with sides, and in places where Plywood leaves from the spangouts, to put wedges under the rope. The places of contact of plywood with the swarthhum must be attached to nails with lining, gradually ending the belling on the forms and sides.
When the plywood is bent, you need to read the lines on it along the edges of the spline, the slander and sides on it. After that, Phaneru should be removed, to read the parallel lines, retreating inside from the previously drawn lines on the sides of 50 mm, according to the ethereal - by 30 mm, and on the spangling - by 20 mm.
After an excess of plywood, which turned out to be over the second battened line, is cut, it is applied again to the place, this time covering only half of the width of the swinger 2. At the same time, it should not forget the Russian proverb: "Several times will die, once again." If it still happens that it is cut off superfluous and the outlet sheet will not cover exactly half the splint 2, then this does not mean that the sheet is spoiled. To use it, you need to move the spark in a quillet or, as a last resort, to shorten the keel at the scene of the softening. The remaining sheets are strifting similarly to the first.
On the folds 2 and 4, the plywood is connected in bulk, so it is necessary for a dense edge connection, a gently strict sheets of sheets, to accurately fit them to each other. When all three sheets are fitted, they can be finally fixed with nails with a length of 30 mm. Distance between nails - 25 mm. At the same time, the keel is closed with plywood and it remains inside the housing, and the dunges on half of its thickness are exposed.
The pillars are best put in the plunk, i.e. In the groove, made in the thickness and contour of plywood. It is possible to do without a tongue, but then the cordable edge must have a bevelled form, and so that the plywood in this case does not breed, as well as for greater strength, it is nailed in shames and a transntion with a roofing iron strip. On the transducer, Phanera is introduced into the spool (Fig. 10, a and b). Before the windscreen fastening, the parts should be covered with a resin or oil paint.
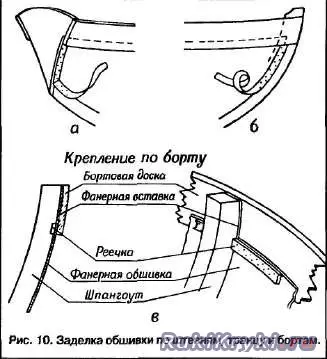
When the casing is installed at about 100 mm to the side, the latter are removed, the plywood is fixed to the spangles and overboard the plywood. The board is finally attached to the splits and cords with nails with washers. Under the sides, above the edge of plywood, between the sides, the plywoods and the terrests are inserted by pieces (Fig. 10, B).
If the Fanoire is fixed to the shames and the swarthings to fasten from the outside, then it is fixed with the inside of 20-millimeter nails with a plywood band or a 30-millimeter width rail (Fig. 10, B). The distance between the nails is 40 mm. Nails must be put in two rows - it is done in order not to cracked onboard boards.
Article on the topic: Round and square crochet motifs with schemes
Finish and coloring
To ensure a greater strength of the case, the trim is tightened with a cloth. The covering is cut out of a bosy or other tissue with the calculation to cover the entire surface of the body to sides. When the workpiece is made and sewn the case, you still need to make two side falsils and an additional central falsil. They protect the bottom from the shores by the shore, and largely eliminate the side drift when walking under the sail.
Falshable are manufactured as shown in Fig. four.
For fake fake at a distance of 170 mm in both sides of the DP from the inner side of the spangling 2, 3 and 4, two vertical holes with a diameter equal to the diameter of the bolts. Note the output of the hole on the fitted fakebills, the same holes are drilled in them. Before you screwed Falekili, you need to put the boat. For this, a putty is prepared from harees and resins. The lime sinking through the sieve is poured into small dishes or on clean Phaneur, in the middle they make a hole in which the resin is poured, and evenly stirrending it with lime from the middle to the edges. Putchal should be like liquid dough.
Lime slowly dries and folded well with a tree. For applying putty make a small spatula. With it, it carefully rubs the seams, connecting parts, cracks, potholes and slots between sides.
From the outside, the boat is covered with wood resin, like most boats. For this, the resin need to be boiled 10-15 minutes and in the hot condition to bring with a brush on the side, not allowing outers. If the resin cooled, it must be heated again, since the hot resin is better absorbed wood. When boiling, caution must be taken, since the resin lights up easily. After two-hand color it is necessary to wear a crosslocked case (before the resin drying). It immediately sticks and keeps well on the housing. All folds and wrinkles should be repaid, the remaining ends to fill in the gap between the side and plywood. After that, you can finally screw fake bolts (additional falsecal can be put on nails).
After installing falsely, they are covered with a resin simultaneously with the coated of the body of the case for the third time (until full saturation of the tissue), then the boat must be put down a boat, remove both temporary timber and cut off the surplus of the futoxon. The inner and the side is covered with a heated oliff twice with a break of 35 hours, and after drying, paint oil paint of any color.
Making cheerful and gentle
The oars can be made from a bar, a thick porger or a 55 mm board. First, it is necessary to mark the markup and push the contours of the oars (position A), and then, turning the paddle 90 °, to process it (position b). After that, you need to do all the roundabilities and clean the paddle. The oars need to be done with this calculation so that the spindlers together with the blade was only a little heavier roller. If this is not possible to achieve, you can add a metal counterweight to Valek. The finished oars grind the skin, twice olive and covered with oil paint. Feed paddle made from a 25-mm board.
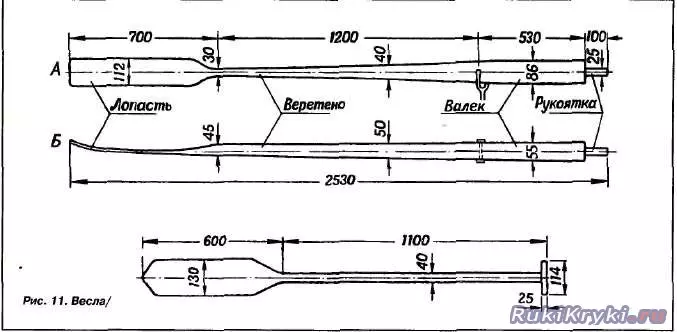
When they are supplied, the blade must enter the water vertically, and the handles slightly go one over the other. The bigger the shoulder roller, the easier it will row. When rowing quickly, the habit of keeping the handles one over the other.
To create a support for sturdy, on the side of the headcins consisting of a steel plate to which the metal tube of the desired diameter is welded. The acquisitions screw themselves to sides from the outside (Fig. 4), and it is recommended to make one of the tubes with a 20-25 mm higher than another to relieve rowing one of the tubes.
So that in the boat could walk, you need to make Sleg. They are made of separate flaps - nasal, feed and two medium. For the support of shields on the splits, square rails 12 mm below the upper plane of the flortimbers.
The location of the middle and rear cans is noted at the bottom edge of the sides. Banks are manufactured from a 15-millimeter board. Under the banks to the sides, you must navigate the rails of 20 × 20 mm. Banks fasten with nails or better screws. The front can be installed at the top edge of the sides. It can be sitting on it, but its main purpose is to serve as a support for mast.
Before conspiring the front bank, it makes a square opening of 50 × 50 mm, and at a keel - a slot 10 × 15 mm depth of 10 mm. Holes in the bank and nest should be on one vertical line.
At first, the boat should be laid directly on the water, without touching the soil, so that the sand and small pebbles do not stick to the resin. To protect the cleapestry should be done for 30-40 days until the resin dry finally.
The steering wheel does not make a boat. Like fishing boats, it is replaced with a stern paddle, which has some advantages compared to the suspended steering wheel. The feed paddle can be both rowed and steering.
If there are random holes, they should be chopped with plywood pieces from the inside. Patches having dimensions more samples are nailed with 12-mm nails and carefully prostrate.
Store the boat should be under the roof. So that it takes less space, it can be suspended.