
Nowadays, a boring monotonous ceiling with defiantly sticking in the middle of the chandelier is unlikely to find a good designer move. Today in the fashion there is a much more spectacular solution - a stewed ceiling with hidden illumination. This way of illumination of the room produces an unforgettable impression, and for its implementation it is not necessary to spend money, hiring professionals: it's not so difficult to make a similar ceiling with a bug of plasterboard with your own hands.
Ceiling circuit with backlit.
According to the constructive execution of the ceiling with backlit is two-level. The second (lower) level is mounted along the perimeter of the room, its edge is often made as splines. Between the first and second levels there is an empty space, it is here that the ceiling backlight will be installed. The lamps are hidden from the views of people who are in the room, and due to the reflection effect it seems that the soft light is smooth flow straight from the ceiling. With such illumination, the interior is perceived quite differently than with the challenges of the chandelier or lamps.
Choosing a lamp
The lighting circuit of the two-level ceiling.
Wishing to build equipped with hidden illumination ceiling of plasterboard with their own hands first is necessary to decide which sources of lighting will be used. Until a certain time, fluorescent lamps were mainly used in such structures or, in otherwise, daylight lamps. Nowadays, they comes to replace a more economical version of the lamp - the LED. Of course, one LED will not be able to provide the light of the necessary brightness, but the whole garland of these elements will be successfully replaced by the incandescent lamp or a luminescent lamp.
An important advantages of LEDs are durability and low power consumption (with the same luminosity, the element consumes half less energy than a regular lamp), but their advantage over traditional lighting sources is not exhausted. LEDs are incredibly easy to install. They do not need chipboard as ordinary lamps. These elements are available in the form of a tape with adhesive substrate, which is enough to glue on any surface, be it wall or ceiling, and connect to the power supply network. Such a backlight can be connected via a special control unit that can recognize the user commands sent from the remote control.
Article on the topic: Curtains to yellow wallpaper: What to choose?
How to choose a LED tape?
Connecting tape with LEDs.
LED tapes currently gained from diodes of various types. The SMD Series LEDs can be considered optimal for the hidden illumination device on the ceiling. Among them there are both more powerful, for example, SMD-5050 and relatively weak, for example, SMD-3528.
In addition, LED ribbons may differ in terms of the number of diodes on 1 bill. The brightest and powerful ribbons contain 120 LEDs per 1 m length, but they are rarely installed on the hidden backlight. Ribbons with the density of LEDs constituting 30 or 60 elements on 1 mm are considered more appropriate.
The most affordable LED ribbons are shining in one color. If you do not embarrass additional costs for a truly spectacular design, look for the RGB class tape. Such a product can change the radiation color either by the user command or automatically according to one of the specified programs. Unlike monochrome models, RGB tapes should be connected through a special controller, without which they will not work properly.
For greater security, you can make a choice in favor of ribbons in moisture-proof. They are equipped with silicone insulation, which will save the device from a short circuit in the case of water from entering the conductive elements.
Backlit ceiling device
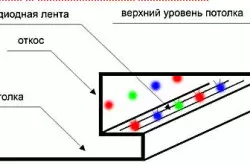
Scheme of installing neon backlight in the suspended ceiling of plasterboard.
Installation of plasterboard ceiling with hidden illumination is performed in such a sequence:
- the first level ceiling device;
- Determine the angle of the room in which the ceiling has the smallest height.
- He retreating along the angle from the slab of the overlap (or base ceiling) to a distance of about 100 mm, we make a mark.
- Now, in one level, with just the mark on each of the walls, it is necessary to read a strictly horizontal line - markup for the future frame. You can draw the markup using a construction level, but it is better to use a laser or water level to control.
- Along the lines of markup, the starting profile should be fixed for the installation of GLC. The profile fastening is carried out using a dowel.
- In parallel, the short wall of the room between the starting profiles must be fixed by the main profile rails. In the middle of the span, the main profile in several places is attached to the slab overlap by means of suspensions. Details of the starting and main profile are used to be made up with self-draws and crab clauses.
- The resulting frame is covered with plasterboard. This work should be performed at least with one assistant. At the same time, one installer will hold the sheet, and the second is to screw it with self-draws.
- Second-level ceiling device;
Article on the topic: Original curtains - new generation curtains
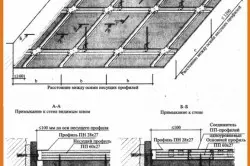
The diagram of the device of a single-tier suspended ceiling.
- On the ceiling of the first level, forth the lines that will denote the position of the edge of the second level ceiling.
- Departing from the battered lines by 40-60 mm in the direction of the nearest wall, fix the starting profile on the ceiling of the first level for the installation of HCL. Profile Try, where possible, to screw to the main profile of the ceiling of the first level.
- From the main profile, it is necessary to cut several fragments of the same length. These details will play the role of the suspensions, they are their length and will determine the clearance between the second and first level ceilings. Saves from the main profile should be inserted into the starting profile and secure self-drawing. Suspension installation step - 500-600 mm.
- From the bottom to the suspensions, the starting profile rails should be screwed, after which the frame is enhanced by runs from the main profile.
- In the inside of the frame, you must start the wires to connect the LED tapes.
- The frame is trimmed with drywall, after which the second level ceiling can be considered ready.
If necessary, along the edge of the ceiling of the second level, you can stick a gypsum mall as a portico, which will more reliably hide the frame elements and LED tapes.
Installation of LED tapes
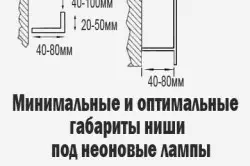
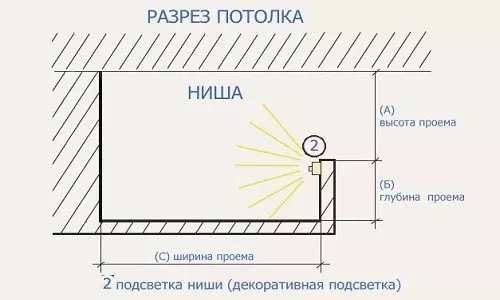
The minimum and optimal sizes of the niche for LED ribbons and neon lamps.
Standard delivery of LED tapes - segments of 5 m long, twisted in reels. To divide the tape on the fragments is arbitrarily impossible, the incision can only be done in specially designated places.
With a consecutive connection of monochrome tapes, the conclusions of the same name should be soldered. In the same way, multicolor RGB class tapes are connected, but it is important not to confuse the conclusions, connecting, for example, the line "R" on one tape to the line "B" to another.
A sequential connection of more than three 5-meter tapes can lead to overload of conductive tracks, in this case, the light emissions need to be connected via a parallel scheme.
Article on the topic: Arrangement around the tree: flowerbed, bench, table and even gazebo
To the power supply and controller, the backlight of the ceiling of plasterboard is connected in compliance with polarity.
Then the tape is included for checking, after which, if everything is in order, glue to the involved side of the second level ceiling.