
Table of contents: [Hide]
- Tools and materials
- Folding chair assembly technology
- Folding stool
- Tuberet's assembly work
Easy, comfort and ability to become minimal in size, freeing the deficit space - all this can be called the characteristics of the folding chair. This causes that often people use folding chairs in oversized premises, in the kitchen, while visiting cottages. Such a chair, of course, can be purchased in the store, but can be made and independently by applying the technology described below. The resulting model will be comfortable not only for the house, but also perfectly fit into the conditions of the cottage. On can be seen such a design. The first stage will be the preparation of materials that will be useful in the process of work on the manufacture of chair.
Folding stool drawing.
Tools and materials
- pine bars with a cross section of 30x30 mm;
- boards with a thickness of 20 mm;
- braided;
- steel rod with a cross section of 10 mm (360 mm);
- screws with a diameter of 5 mm (length 70 mm);
- nuts;
- washers;
- self-tapping screw;
- chisel;
- saw;
- PVA glue.
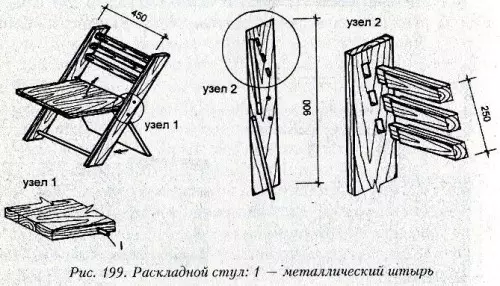
To make long, you should use a 900 mm long bars, for the manufacture of shorts you will need a bars of 550 mm. The chair has a cross-ligament for 2 long legs, for which you should use a couple of segments of the board with dimensions of 400x50x20 mm, as well as 340x50x20 mm.
Rake, which should have 400x70x15 mm sizes, will form a backrest. Two more cuts of the chalkboard with dimensions of 280x50x20 mm will perform in the role of crossbar combining short legs. Two blocks with dimensions of 290x30x30 mm will be needed to create a seat with a seat that should be dial from 6 rivers, each of which is 340x40x15 mm.
Article on the topic: Warm floors with your own hands in the apartment on the 1st floor
Back to the category
Folding chair assembly technology
Chair assembly scheme.
Start the work on the assembly follows from the seat. To do this, take support, putting them in front of you. With a retreat of 40 mm from the edges, drill holes that will be useful for the steel rod. Holes should be drilled on both rackets with a retreat on the other side of 70 mm supports to form holes designed for the screws that will fasten the seat with legs shorter.
Then you need to fasten the seats to the supports using the screws. The first, located behind the rear must be screwed at the outer edge so that the support bars are removed by 340 mm. Then you should take the second rail to fasten it with self-draws. To do this, retreat 3 cm from the edge of the rail from 2 sides. After you can fix the remaining rails that make up the seat. The fastening of the remaining rails should be carried out between the first and second in such a way that the grooves of 1 cm remained between them. After the steel rod will be traded into the hole, the seat can be finished.
Next, proceed to the manufacture of long legs. The upper part of the legs should be equipped with holes under bent, for this, 110 mm should be retreating from the upper edge. This will be necessary for fixing the transverse bundle with a length of 340 mm. Under the back is required to be marked. From the holes you need to retreat 40 mm. Here it is necessary to exercise with a saw. Bruces of legs in the side parts should be equipped with grooves, which should be cut by a saw, will walk the rod in them, leading the seat in motion. Clear ends should be cleaned with the use of the chisel, it will help to obtain a single groove depth from beginning to end.
In front, the lower part of the legs is supplied with holes, which will strengthen the second transverse ligament by self-draws. To do this, it is applied to the legs, which will help through it to drill holes intended for self-tapping screws, 2 screws with each of the sides. In order to avoid swinging before screwing, those places where the items will touch, you need to wash with glue. Then you can proceed to the assembly of the frame of long legs. To do this, the crusters are inserted into the gaps, which was previously fixed in the seat, fixing the legs with ligaments. Each rigid connection must be missed with glue. The back must be fixed by self-drawing at the top of the legs.
Article on the topic: How is the painting of the ceiling with their own hands?
Sizes of folding chair.
Now you can proceed to the manufacture of small legs. After the middle of the legs were measured, the holes in which the screws connecting the legs of different lengths will be inserted. From above, you need to drill holes for screws that will fasten the seat with shorter legs. It is permissible to drill holes in order to hide the screws completely.
On the impudent, it is necessary to fix cross-shirts, each 280 mm. All compounds should also be missed by glue. One must be strengthened closer down the book, and the second - above the connections with longer legs.
At this stage, you can proceed to the assembly of the chair. With the help of screws, the seat must be strengthened to the legs. Thus, the wooden chair will receive hinged connections. Now the chair, with your own hands, ready.
Tools and materials for folding tools:
- mill;
- Lobzik;
- screwdriver;
- Sander;
- clamps;
- roulette;
- pencil;
- Butterfly loops;
- hairpin;
- braided;
- PVA glue;
- toning varnish;
- beech shield;
- Building angle.
Back to the category
Folding stool
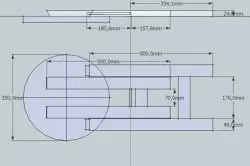
On presented folding tobabrette with all sizes.To begin with, cut the circle, the diameter of which is 350 mm, and the shield must be used. Such a folding stool will look like. It can be seen that there is a handle in the seat of such a design. For its manufacture, you can use the drill, the diameter of which is 22 mm, they should drill 2 holes in the seat, and it will be necessary to withstand the same step from the edge. The distance between the central dots should be 120 mm. Next, the holes need to be connected with propilation by receiving a handle.
Drive parts from two sides can be cut. Jumpers and details of the legs from the inside are not necessary.
The straight mill of 8.5 mm, necessary for the formation of a gap in the inner frame of the legs, can become a problem, since such cutters on sale are very difficult to find. There are 2 alternative options for the reduction of the gap. One embodiment involves the formation of holes for the length of the gap and the subsequent knocking down of the jumpers using the chisel. The second option provides for the formation of 2 finite holes, as in the process of milling, and further dumping between the channels, for which the jigsik should be used. In this case, you will need a leg, which will help exercise longitudinal cut.
Article on the topic: Door limiter with his own hands: Tree stopper, fabric
The legs on top need to be styled by forming an angle equal to 30 degrees. From the bottom, the leg is preferable to round. The jumpers between them are mounted on the wrappers, lubricated with glue. The details of the legs should be strengthened by clamps, and after being left before drying.
Back to the category
Tuberet's assembly work
When assembling a stool loop, you need to fasten with screws of 3.5x16 mm. But the legs to the seat must be fixed on the loop. Using the shield trim, you need to pull the tube that will close the middle of the hairpins. In the process, a small lathe should be used, but there is an alternative solution that involves the manufacture of a tube with a round cross section, but a multifaceted, which can be achieved using a planer.
In order for the stool to have saturated color, you can wet several times, drying all the details. After it should be treated with the shallow sandpaper, cover with varnish in two layers or more, after that the stool will not only be comfortable, but also a stylish interior item.