
Well, if you nevertheless decided to deal with it, we suggest familiar with the simple Installation instructions for timing timber.
So, the material has been purchased. Take the simulation of timber to the week for acclimatization to the object. A tree during this time is adjusted under the environment by humidity. This is not good. You will prevent the appearance of deformation and cracks on the finished surface. Protective film can not remove. Fold the boards under a canopy either on the veranda.
Installation of timing of timber with their own hands
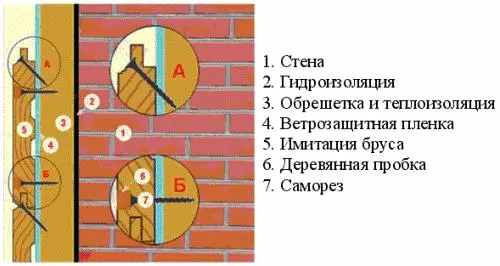
1. Waterproofing. To do this, you can apply a parchment or similar material that is fixed with aluminum tape. The edges are placed in the brass. You can apply any other acceptable type of fastener. Further, the waterproofing is quite well plugged in the cerebral design.
2. Doom. It is good to dried the square of the square section. The cross section of the bar is selected respectively the thickness of the insulation. Nevertheless, the bar need to take 30 mm and more.
Stands of the crates are installed at intervals equal to the width of the insulation. Euromathes have a width of multiple 60 cm . Polyfoam is produced in sheets having a width 1m . Consider the dimensions of the selected thermal insulation material and proceed to the fastening of the crate. When choosing fasteners, consider the composition of the surface of the surface.
3. Warming. Warming up the outside of the wall helps to move the dew point and retain the dryness of your room.
4. The second layer of hydro-vaporizolation. We cover the insulation with a pergamin to another waterproofer of similar properties. Again, edges overlapping each other. We fasten in the same way as the first layer.
For internal works, the insulation and hydro-parobarar service is not necessary. In this case, the imitation of the bar is attached to the crate. The gaps between the wall and facing board will prevent condensate loss.
Article on the topic: Painting tiles in the bathroom - how and how to do it
5. Installation of timing of timber. Fasteners of the boards from below delivers the masters convenience that the horizontal is easily aligned at the bottom with the top using the level. At the same time, installers need to avoid the overcasts of subsequent rows.
Condensate will not accumulate in the groove if you secure the boards up spikes. Technological gaps of 1-3 mm will provide boards freedom of movement with air moisture drops and will allow facing to avoid deformations.
6. Mounting options for timing of timber. Which option to apply depends on how wide the board and what is its thickness. We bring to your attention a few options:
- The letter "A" shows in the figure, how to fix the material with nails and self-pressing, which are twisted into the spikes under 45 °. If you want to avoid cracks, you can drill a hole for each self-sore (nail) in imitation of the bar.
- You can screw the screws with the front of the board. (See "B" in Fig.) For each bar, the crates will need two self-pressing. To hide the hats of self-tapping screws, you need to make tilt. Those. Make a hole slightly larger than a hood of a metric depth of 5-10 mm. After the self-tapping screw is spinning, disguise the hole with a wooden plug. To do this, you can apply PVA glue. When the PVA dries, process the place hung out the sandpaper.
- You can just score nails in the grooves.
- Kleimers. They can also be used.
7. Painting. We open the finished wall with varnish, paint or wax.
8. We admire the result of the work And congratulations to yourself for what everything turned out.