
Installation of the suspended ceiling from the MDF panels - the task is not difficult. Manufacturers of component panels and frame systems are well thought out by all possible situations and difficulties that may occur when installing such a ceiling.
It should be remembered that the best tool for cutting the MDF panels will be an electrobrice.
Required tools and materials
To mount the suspended ceiling from MDF panels, you may need the following tools and materials:- Perforator;
- water or laser level;
- Construction cord;
- Scissors for metal;
- instrument for searching for hidden wiring;
- Thin marker or construction pencil;
- roulette;
- Corolnic;
- hacksaw with fine tooth;
- electrolovik;
- screwdriver;
- a hammer;
- chisel;
- nails for kleimers;
- kleimers;
- MDF panels;
- UD profiles;
- CD profiles or wooden rails 25 * 50 mm;
- Connectors for profiles;
- direct suspensions;
- Dowels ceiling "Anchor-Wedge";
- Dowels "Quick Installation";
- Self-tapping screws "Press-washer";
- Self-tapping screw LN 9.5 mm;
- Self-tapping screws 25 mm long with a secret head;
- Glue for MDF;
- Dobly elements.
Back to the category
Frame device
MDF panel installation circuit.
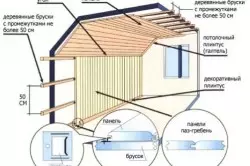
If the draft ceiling indoors is made of precast concrete panels, you must first perform preparatory work. Rusts between the plates are cleaned from everything that does not hold well. The aesthetic properties of the rough base values do not have, so the seams are easiest to fill in the mounting foam. For wooden plastered floors, it is enough to make sure that the edge of the finishing material is durable. If the strength of plaster causes doubts, it is better to knock it down. Indeed, in the process of mounting the suspensions, the clutch quality will still deteriorate. And this is already threatening the strength of the future design.
Next, you need to apply in the corners of the room of the horizon mark, i.e. Serfs that will be located strictly in the same level. It is easiest to do this with a laser level. But the usual water level with a tube of sufficient length is perfect. Use for this bubble level on the rail is not desirable, it can lead to significant errors.
Article on the topic: How to make a fire at the cottage, in the yard
Open Ceiling Scheme.
At the resulting marks, we determine the lowest angle of the ceiling of the room. The rough base is rarely horizontal, discrepancies typically reach several centimeters. From the level of the bottom point of the draft ceiling, we retreat 5 cm. At this mark we will make the basis of the ceiling. Using the horizon and roulettes, we transfer the placement of the future frame to all the corners of the room. Using the construction cord, we apply a horizontal line around the perimeter of the room at the selected height.
Then you need to make sure that the power supply is not laid at this level in the room. For this there are special devices. If there is no available, you will have to use the hammer and the chisel to carefully look for the stagnation of the construction workers. An indirect sign of the position of electrical wiring is the placement of mounting boxes. Stripping the easiest of them.
Fresh UD profile around the perimeter of the room, so that its lower shelf accumulating with a horizontal line. It is attached to a concrete or gypsum base of the "quick installation" dowels to the hole drilled by the perforator. For the walls with a wooden basis for this, the tapping screw "Press-washer" will be suitable. The length is chosen so that the carving is part of the wooden base for at least 25 mm.
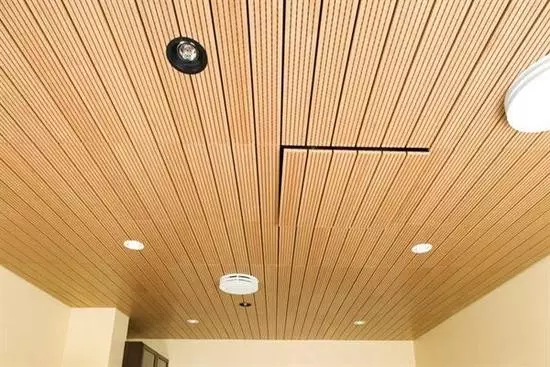
Next you need to decide on the direction of installation of the MDF panels. Because The panels have a finite length, it is desirable to choose the direction at which they would not have to build up. In addition, keep in mind that the placement of panels along the long side of the room visually lengthens it, and across it shorts.
When the installation direction of the panels is selected, it is placed transversely to them on the ceiling the position of the carrier frames of the frame. Mounting them will be performed along the entire length of the panels in 30 cm increments.
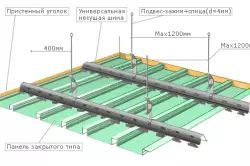
Marking of the suspended ceiling.
In places location of future carrier rails, direct lines on the ceiling. Along the lines perpendicular to it, direct suspensions are perpendicular to them, also with a step of 30 cm. On concrete bases, they are fixed by clogged dowels, on wooden - press-piles of sufficient length. It is chosen as well as for mounting the UD profile to the wall.
Article on the topic: how to make the door from the lining with your own hands
In the grooves on the UD profile across them, CD profiles or wooden rails 25 * 50 mm are inserted. They are fixed to the bent paws of direct suspensions with self-draws LN 9.5 mm. Excess lap length simply rejuvenates. On bent paws, it is convenient to label sheets of polystyrene insulation, if insulation is performed. If necessary, profile or rails need to be increasing with connectors. All lightweight galvanized profiles are easily cut by metal scissors. If you use wooden slats instead of galvanized profiles, try to find smooth and dry, which is not easy. Before facing, you need to pave all the necessary power supply wiring across the frame.
Back to the category
Facing a frame panels
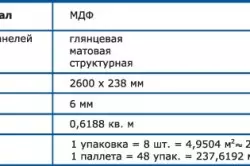
Table Characteristics of MDF panels.
The panels are easily cut into the desired size using an electrolybiz. Marking is done under the square. There are different ways to fix the external faces of the first and last panel. In the simplest case, this is done with the help of screws on metal with a length of 25 mm with a secret head, and then stick the joint with walls around the perimeter of the room by a universal corner of MDF or baguette. But this method is not quite correct. The fact is that the MDF panels are subject to resizing depending on the temperature and humidity in the room, so the rigid fixation is undesirable.
It will be more correct to pre-fix around the perimeter of the room to the UD profile of Ln 9.5 mm J-shaped profiles with a groove of suitable size. Such profiles are with a molding molding molding and look quite aesthetic. The outer sides of the extreme panels and the edges of the intermediate simply come to these challenges. Such a fastener does not prevent oscillations in the length of the panel.
Between themselves and to the slacks frame panels are attached as follows. The MDF panels have on one side the protrusion along the type of spike, and with another corresponding to the size of the groove. The spike is started in the groove of the previous panel, and the other side is fixed to the rail with the help of special fasteners - kleimers. The last panel will start in the grooves on the J-shaped profile and is inserted into the groove of the previous panel without additional fixation.
Article on the topic: How does the smad-free gas column work
Kleimer has a private plane and a bent hook, which is attracted by the panel groove. There are three holes on the kleimer: the central is very small and two side slightly larger diameter. If the installation of panels is performed on wooden rails, the kleimer is nailed to them through the hole of the smaller diameter. Nails are sold complete with kleimers. For installation to galvanized profiles, two side openings of larger diameter are used. Through them, the kleimer is attracted to the profile with Samores LN 9.5 mm.