
Each home master knows that high-quality furniture can only be when it is made with your own hands. There is no smaller things here, so it will be not so easy to make a chair from DSP with their own hands, but the result will please.
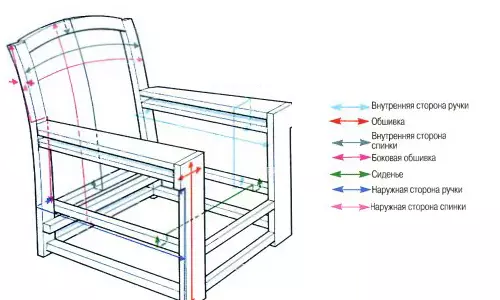
Chair device diagram.
Preparatory activities
Tools and materials:
- LDSP 20 mm;
- electrolovik;
- roulette;
- pencil;
- Bar 50 * 40 mm;
- brush flat;
- antiseptic;
- sandpaper.
Wood-chipboard is the optimal material for most furniture species. They possess a number of interesting features:
- Physical indicators. It is necessary to work quite easily and quickly, in addition, the safety margin is very high. The only minus is an instability to a sharp side effect (strong shocks), but with adequate operation, this minus is impaired.
- Designer features. Laminated stove can have any color as the master will prefer.
- Ecology. Fully glued ribs are perfectly isolated with a chips from interaction with the environment, thanks to which the material refers to harmless.
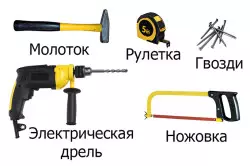
Tools for making a chair.
A chipboard armchair can be used as a chair and a bed, and the chair will be medium height, and the bed is solid enough, the rest is high-quality. Such an approach will not make something very complicated, but if desired, arbitrary modifications are possible.
At the very beginning, you need to organize sawing chipboard for the future folding chair-chairs:
- LDSP 90 * 70 cm - 3 segments;
- Bar 23 cm - 4 cuts;
- Bar 65 cm - 2 cuts;
- Bar 70 cm - 6 cuts;
- Bar 90 cm - 6 cuts;
- Bar 60 cm - 6 cuts;
- Bar 95 cm - 1 cut;
- Bar 50 cm - 2 cuts;
- Brusok 30 cm - 3 cuts.
It is with this material that all further activities will be carried out. The part will have to be cut, so it is not necessary to clean the electroller.
Article on the topic: How to paint the lining on the balcony: choose varnish, impregnation, paint
The resulting segments are thoroughly rubbed by sandpaper, so that then do not injure their hands. Chipboard rubs away from the edges to the center to avoid any external damage to the laminate. In the same stage, you need all the wood to treat an antiseptic against moisture and insects. This measure is obligatory if you need to extend the operating time of the chair-chair.
Main working activities
Tools and materials:
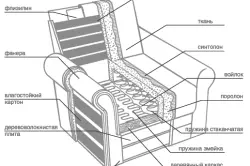
Harness upholstery scheme.
- electrolovik;
- Chipboard;
- bar;
- screwdriver;
- screws and screws;
- hinges folding and rotational;
- foam;
- upholstery;
- Stapler.
That is the time of the main assembly. It begins exactly at the moment when the antiseptic will completely dry. At the very beginning of this process, it is necessary to screw up 4 bar (70 and 90 cm) on each plate at the bottom of the perimeter, and so that the joint is possible, it is necessary to make slaughter cuts under 45 degrees. For the attachment initially, the holes of a small diameter are originally drilled, after which it will already be possible to fix the design with screws in a step of 25-30 cm.
When the main elements are ready, you need to assemble the supporting structure for the head restraint:
- Parallel 2 bar 60 cm are laid out, after which they are connected on top with a cut of 30 cm. A similar procedure is repeated 3 times.
- All 3 sections are connected to each other with 50 and 95 cm bars at a height of 20 cm above the floor level. As a result, it turns out perfectly stable design, which remains to be connected from the inside.
1 from previously trained shields is mounted in the finished reference design. The height is 20 cm above the floor level, and the points of fixation pass through the legs in the headboard (2 pcs.). For a reliable screed, ordinary loops are used that will not create an overpressure of the material, and at the same time will provide a free head restraint lift in its place.
In order for when lowering the design, the design stopped at the desired level at a height of 20 cm, blocks are installed. You can perform them from galvanized corners (total 2 pcs.) With plastic nozzles. For fixation, it will take 2 screws for each.
Article on the topic: How to make a screen for a battery with your own hands
The remaining 2 segments are attached to 2 legs (23 cm), which during the installation will be from the opposite side of the head of the head. Such a location will allow you to evenly distribute the load. The mount is made on ordinary furniture loops, which will lower the support under their own weight when placing and similarly select when assembling.
In order for the sections to connect to each other, it will take a bit of seamless. The loops between the headboard and the central section are attached on the sides (rotating hinges are attached to the supporting structure), in order to assemble the central section, it was possible to put the head of the head of the head. After that, it is mounted below the foot of the foot, which when adding it turns out to be the legs below.
Completion of work
At the very end, it is necessary for each segment to pave batting or foam rubber, then tighten with any upholstery cloth, and fix the edge with a special stapler. The headboard is so closed from 2 sides.
All stages of the manufacture of chair-chairs pass quickly enough, so you can start in the morning, and by night the product will be completed. Although most often it takes 2 days.
With a high-quality manufacture, this piece of furniture will serve at least 10 years, and when it is properly operation and 30.