
Floor flooring is the long-awaited step of transition from the state "When this construction will end" to the state "it seems, it will soon end." Premises acquire a more or less normal form, it is easier to evaluate area and volumes. On open tracks, verandas, in the hozblocks, the boarded floor is filling from the edged board. But there are sluts that, in this case, is permissible. In residential premises, they usually use a special circulatory board. Its installation has its own characteristics, which we will talk about in this article. So, laying the floor from the headboard - details and techniques.
What is a t-shirt board and what it is better
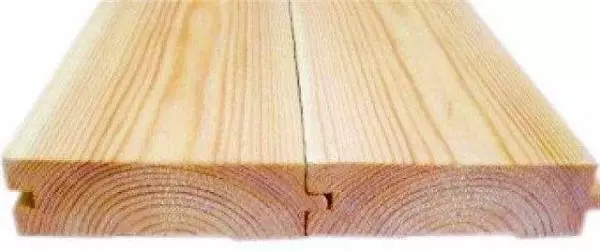
The whipped board is called, along one side of which the groove is cut along the other - spike. When laying a spike enters the groove, creating a more durable connection, excluding "blowing". And this is a plus compared to the edged or deck board.
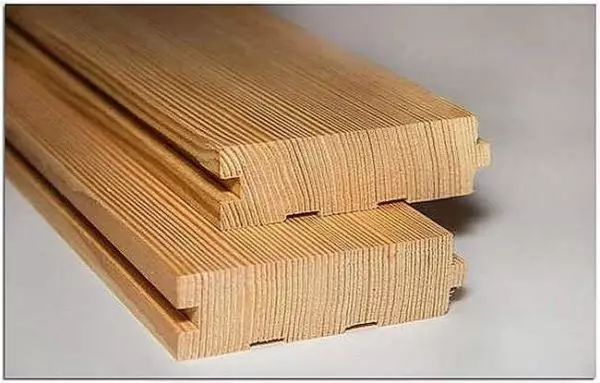
So looks like a tank board
Another plus is associated with the technological process: the pinned board "customizes" by geometry, cutting the sidewalls, grind the front side, the longitudinal grooves are cut on the back side for better ventilation. Then, on the treated sidewalls, the milling and grooves are formed. So after that, the centering board is ready. With such a processing, the difference (especially in the low-grade product) is definitely, but not so big and grinding is needed, but not in such a volume, as when using a edged lumber.
A little about why it is much more expensive. There is a lot of work, it is for this reason that this material is much more expensive, but the floor is stronger, more reliable.
How to choose high-quality material
Laying of floor flooring begins with a selection of material. First talk about sizes. The width of the geepboard is from 70 mm to 200 mm. To take too narrow - a lot of time will go to the laying, too wide - the likelihood of the board is very large, about when the edge of the board is dried, the floor will be ribbed. The problem is solved by grinding, but these are additional costs of time and means. Because most often take the centering board of the medium width - 130-150 cm.
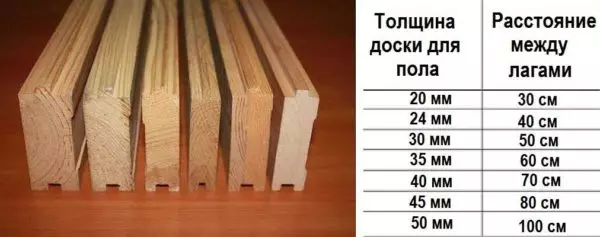
Choosing the thickness of the floorboard depends on the distance between the lags
The thickness of the tipped board from 18 mm to 45 mm. Putting finely disadvantageous - so that it does not be bitten when laying on the lags, their (lags) must be set. Therefore, for the floor, a timber with a thickness of 28 mm, 36 mm, 45 mm is used.
The tank board is sold different lengths. Standard - 3 m and 6 m, but produce 4 m and 5 m. Here the choice is simple: the length of the material should be slightly larger than the length of the room in which it will be laid. It is not very beautiful to splict in length, because it is more like that.
Selection of wood breed
Floor board makes pine and spruce, larch, oak or ash. Pine and spruce is not expensive, but they have a soft wood. Traces remain from heels, fallen objects, are joined with furniture. In places of active movement over time, "Trails" are formed. The situation can save the coating with a wear-resistant varnish in several layers. If you satisfied this option - the choice is good.
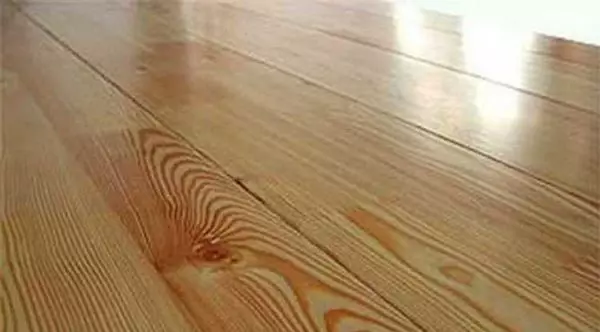
Pine or firing tipped board under varnish serves a long time
A tipped board of larch - more expensive material, but also more wear-resistant. Wood has a pronounced drawing, nice color. It can be used without coating or coated with oil-based compositions without creating a solid film on the surface.
Article on the topic: Children's furniture with their own hands: Features (photo)
Oak and ash are very beautiful deciduous rocks with dense wear-resistant wood. But the price of them is completely inhuman. As in the previous embodiment, the floor of these tree breeds can be used without coating or with more gentle compositions.
Screwdered boards and its characteristics
All lumber are divided into four varieties:
- Class "Extra". Make from top quality material. There should be no brown or black bitch inhomogeneities, cracks and other defects.
- Class A. Permissible single spots, otherwise no defects.
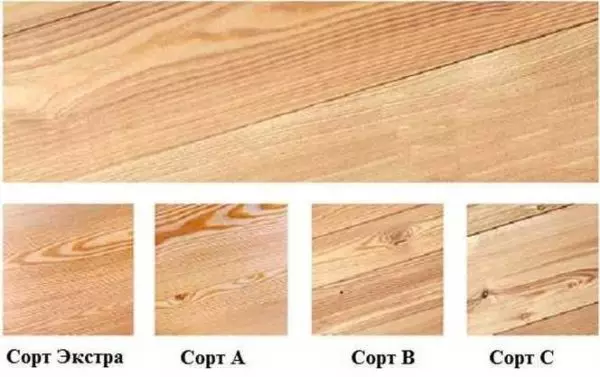
The difference between different varieties of a tank board
- Class in (or av). There may be brown bitch, heterogeneity and stains.
- Class C. Admissible inhomogeneity, stains, black and brown swirls, some of the cross-cutting spots from the knots.
Grade C is used with a roughing device. For finishing in it too many defects. The remaining classes are suitable for the final coating, but what kind of grade, select depends on financial capabilities - the difference between classes is decent.
Humidity
For comfortable laying of the floor from the headboard, choose wood chamber drying wood. In this case, the raw materials after sawing are withstanding in the drying chambers, in which it is brought to a humidity of 8-14%. Such material after laying is unlikely to die - it is already almost impossible, but the cost compared with the material of natural drying is about 50% higher. This is due to the cost of equipment (drying chambers) and drying fuel.
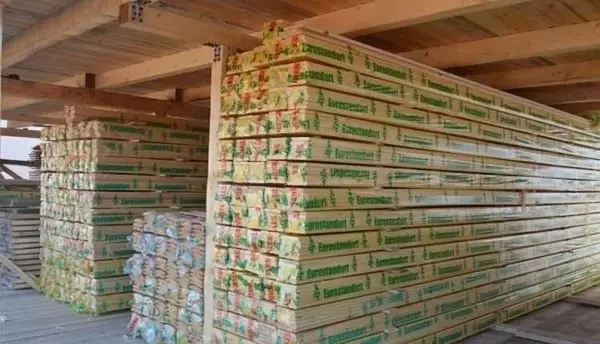
Packing chamber board packed in polyethylene
The humidity is measured by a special instrument that professionals have, and not everyone. You can still try to determine in appearance. Most often, the lumber of chamber drying is packaged in polyethylene - so that it does not absorb moisture from the air. Naturally, the packaging must be intact and there should be no moisture on it (condensate on the inside). If you knock on dry wood, it makes a ringing distinct sound, wet sounds deaf.
What will happen if you put the floor from the t-shirt board of high humidity? The first with which it will have to face - with the formation of slots as you dry. In six months or a year, the floor will have to be transferred, removing the resulting gaps. The second - when drying, cracks often appear, wood winds out in different directions. Sometimes these curvatures can be compensated by pressing the board more accurately, sometimes not. So you have to keep a pair of boards "about the supply": to add when he is dried from drying and to replace strongly fried fragments.
Geometry
When choosing, be sure to pay attention not to geometry. In addition, which the thickness and width of the board should coincide, there is no significant curvature, it is necessary to pay attention to the correctness of the formation of the tongue and the groove:
- The groove in depth should be a little more tongue. In this case, the laying of the floor from the t-shirt will be simple and do not have to manually refine the sawn timber.
- Track the distance from the top plane to the tongue and the groove. It must coincide, and on all the batch boards. Then, immediately after laying, get a smooth coating that does not require additional grinding.
Two pinned boards must be shy without gaps
In normal production, this is all tracked, but there are very large scatter in realities - 5 mm is not the limit. It is clear that such a floor will have to grind. But, the smaller the discrepancy, the less the scope of work will be. Therefore, try to find the producer who has this difference is minimal.
Installation of floorboard
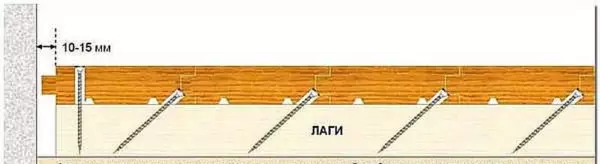
Due to the possible drying of wood, the floor laying of the floorboard is carried out in two stages. The first time is fixed only every 4-5 bar, after 6-18 months, the coating is dispersed, eliminating the formed gaps. The second time already fasten each board, to each lag.
If the room is dwelling, wood for a year until you dry, rubs and loses an attractive appearance. So that this does not happen, the first time the pinched board is fixed with the back side. When re-laying rotate its face top. We have a clean coating.
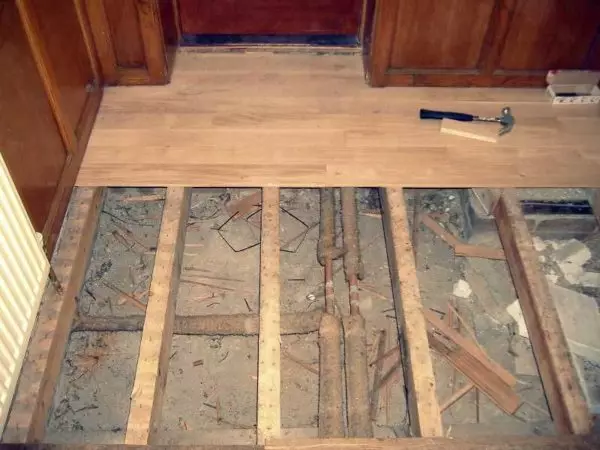
Laying of the floor from the centerboard on the lags is the most acceptable option.
When purchasing the material, do not forget to leave several slats to leave so that you can add after tightening. Depending on the original humidity and the width of the boards, one or two (or even more) additional option may be required. They are also left for drying. It is advisable in the same room, but you can in the attic. On the street is already a problem, since the appearance will be "not that."
Fastening method and fasteners
Laying of the floor of the tipped board can be carried out using nails or self-tapping screws. Nails are made of flexible steel and put significant loads. When "twisting" the board, they bend, but do not break. Only there is another problem: remove them without damaging the wood is very difficult, but sometimes it is impossible. And it is necessary to remove the fastener when replacing too twisted boards or when the floor is leaning after drying wood. Therefore, they still use selflessness, and not black, but yellow. Black made of fragile kalena steel. In the side loads that occur during the "twisted" boards, the caps simply fly away. So, it is better to use yellow tapping screws to lay the floor from the tipped board.
There are three ways of fastening the geepar board, two of which are counted:
- In the ramp The most reliable way, but it does not suit from aesthetic point of view - fasteners are clogged into the front part.
When attaching to the ray, the fasteners are installed in the front of the board - two, retreating from the edge of 5-7 mm
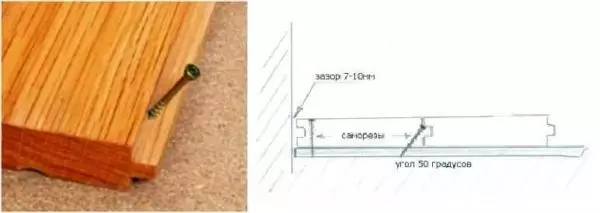
- In the groove. When attaching a tipped board in the groove, the screws are screwed into the lower part of the groove at an angle of 45-50 °. The hat at the same time should go into the material well so as not to interfere with the next. This method is simple, but the board is attached only for the lower part, which constitutes something about 1/3 of the total thickness of the board. If during drying it will be "twist", the likelihood of splitting will be great.
Mounting in the groove - self-tapping screw or nail clogged into the groove groove
- In the spool. With this method, fasteners are installed in the base of the spike (sheet). It runs about 2/3 of the blackboard thickness, which is clearly more. But with this method there are some inconveniences at the flooring - when fitting the boards, it is necessary to ensure that it is not to damage the spike.
Installing self-pressing spike - a large thickness is captured
When a secret attachment, the self-tapping screw must be installed so that it does not interfere with the installation of the next board. For this, the hole is previously drilled (the drill on the diameter is equal to the diameter of the hat), and then the screws are installed. The fasteners dimensions depend on the thickness of the board, but most often used with a length of 70-75 mm and a diameter of 4-4.5 mm. Such a large length is needed due to the fact that when a secret attachment comes a screw at an angle, it turns out - for not very much depth.
If still decided to make a reliable mount in the ray, it can be done less noticeable. This is achieving drowning the head into the wood (you can pre-drill the hole). The resulting recess is sealed with a putty on a tree and grind. The second option is to cut the Cup, install it in the excavation and also polish. But it all requires a significant amount of time and skills, because when installing a t-shirt, prefers to use hidden fastening methods.
General rules flooring
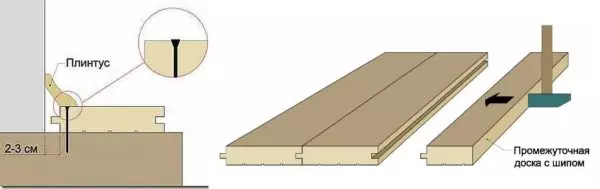
The first row is placed with a gap of 5-7 mm from the wall and fasten it, retreating from the edge of about 1 cm, in the front surface - in the ray. This place will be closed by plinth, therefore you can. If the installation method is selected "in the thorn", the groove turns to the wall, and vice versa.
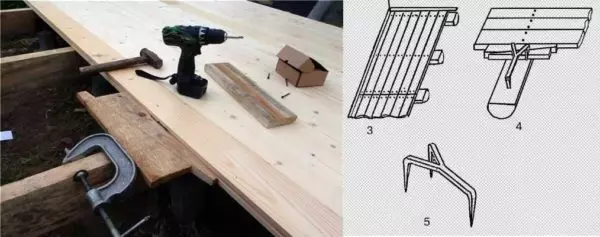
Flooring a wooden floor with his own hands: I need a hammer, a screwdriver, drill
The last board is also stacked so that some gap to the wall remains. It can be provided with linings and wedges that are clogged between the wall and the last board. It is also attached to "in the ramp", retreating about 1 cm from the edge.
How to pull the floor boards
If you take a circuit breaker class AV or B, there will be a lot of curved board. The longer the board, the more apparent will be curvature. The first few pieces from the wall try to choose the most even. They are placed, secured. This will be the basis for which you can navigate. Next, the boards are trying to select so that the arched places alternate. They are pressed or they say still "tighten", trying to make it so that the cracks are not.
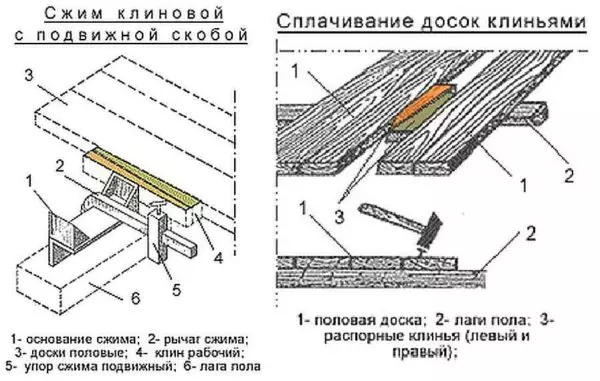
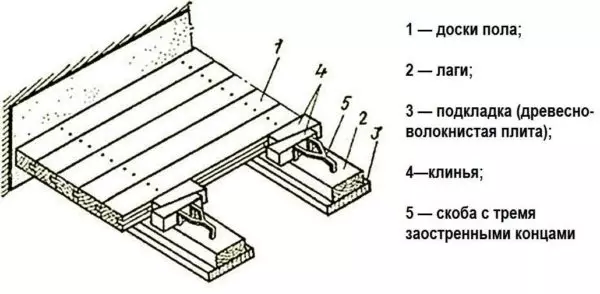
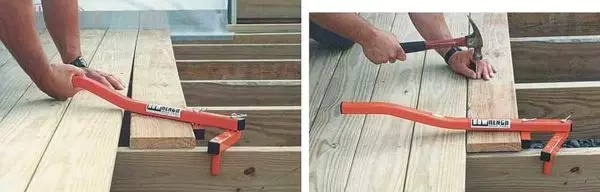
Right traditional way of screed curves of genital boards
Separate devices are used for flying board. For example, the support plank is nailed at some distance and several wedges. This method is good to everyone, in addition, which you have to screw the support every time. With rough styling, when only 4-5 board is fixed, it is still fine - you can pull a few times a few pieces. But if you need to attach each, it takes a lot of time. Therefore, clamps are used, special brackets, other devices. Clamps are simply fixed to the lags, the brackets are clogged into them, after which ordinary wooden wedges use, which split the coating, eliminating the gaps. And the other option take less time.
Clamps and special brackets are installed faster
There are factory options (in the photo below). The main thing here is a cunning mechanism for fastening to lags on the clamp. It is also interesting for the retention of boards in the desired position.
Factory version of the device for hassle
When working, make sure that the floor laying from the headboard does not "leave". This can be seen if you look at the laid floor from the side: the flooring can be bent along the edges in one of the sides. To prevent this, periodically measure the distance from the placed board to the walls in several places, adjust its position to acceptable indicators.
In the video, it is shown in more detail how to work with similar devices. The first is a traditional way with a stubborn board and wedges.
The second is an unusual homemade stillage clamps and angle for ceiling mounting beams. An interesting option - you can adjust the length of the climb, that is, you can rearrange it.
Very interesting way to quickly edit. But in this case, the floor laying of the floorboard is produced together: one presses, the second sets fasteners. We only have to pre-chop holes under the desired lumber width.
Can the floor laying from the t-shut-off board do without this stage? Maybe, if you buy an Extra class material or to raise meter (or cooler) pieces. On a meter segment of the gap if there is, they are small and easily adjusted without fixtures.
Article on the topic: How to Clean the dirt paper wallpaper